
This blog post was created because, just like you, at one point I wanted to record a multi-track podcast with remote guests. Someone told me to use “.. a Mix-Minus setup…”, but after hours of Googling, I didn’t find my answer. Well, hopefully, this is your last stop on this Google rabbit hole.
My Promise to you: by the time you are done reading this blog, you will (i) understand what is a “mix-minus” configuration, and (ii) be able to configure it using Logic (Pro) X on your Mac.
You can skip to the “how-to” section if you think you understand Mix-Minus and only care about the step-by-step instructions, but I would argue that even if you think you understand it, you want to read the theory part first, because, and I say it from personal experience, this mix-minus remote-recording process is confusing!!! If you first read my theoretical part, at least the how-to part will be easier to follow because it will use the same “language”.
Editorial note: I originally posted this blog back in mid-2018, but since then Loopback by Rogue Amoeba, which this solution depends on, was updated to version 2.x that was not compatible with the original writeup. I also learned a few tricks since then and I found ways to make this process a bit easier. Also, I’m writing this in November 2020, about ~10 months into the COVID-19 pandemic, where remote recording is needed more than before, now that so many people are preferring to stay remote and record from home!
The Theory on One Leg
Let’s start with “what” is a mix-minus, then go to the why we need it, and finally, we’ll dive into the how!
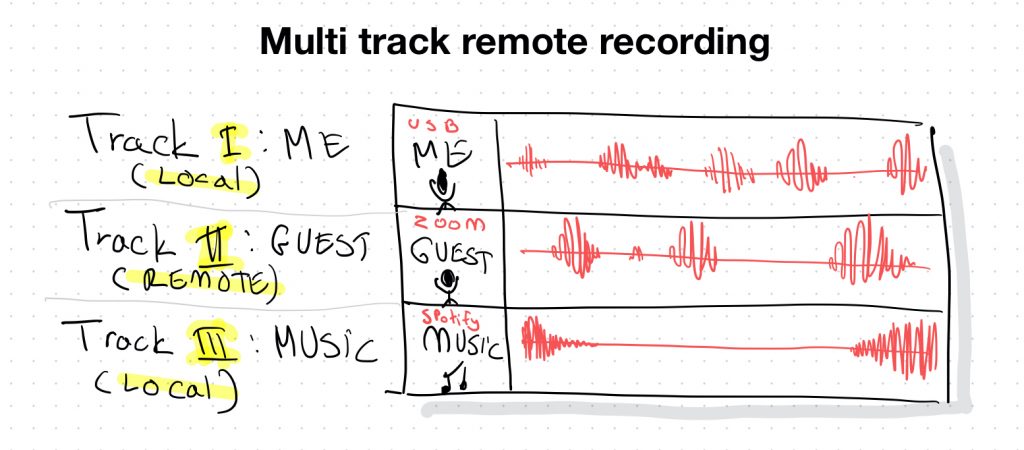
What is a Multi-track recording
A multi-track recording is what DAWs (Digital Audio Workstations) are all about, record your multiple sources of audio on separate tracks, so that you can edit them individually, then mix them together, and master them into a single stereo mix and finally bounce your mix into a ready-to-share MP3 file. If all your guests are located in the same recording studio, you can do this quite easily by routing each guest’s microphone into a separate channel, and off you go. I assume you already know how to do this, so I will not dive into details on this part.
What is a Mix-Minus, and why do I need it?
Good question. When all your guests are in the same room, all you need in order to have a conversation is making sure that they all can hear each other, and whatever music/SFX you are playing to them all. Typically, you can just let them all hear the same rough mix that you are listening to while recording. But, when your guests are not all in the same room, mostly because of the delay of the Internet, if you let them all listen to the same rough-mix, each participant will hear themselves in a slight delay, just slight enough to drive them crazy.
The premise of Mix-Minus: provide each participant with the same master mix minus their own voice. By doing this, we can ensure that they don’t hear themselves, and don’t get confused by “that other person who sounds almost like them and keeps interrupting them every time they open their mouth” 😂.
How does Mix-Minus recording works
Before we jump to the step-by-step tutorial, let’s understand how does a multi-track mix-minus remote recording works.
It is important to understand that there are two separate problems that we need to solve for here:
- Record each source of audio (yourself, remote guests, and your music app) into individual tracks
- Create a mix-minus to send back to each remote guest
Let’s start with the multi-track recording, and end on the heavier mix-minus topic.
Multi-Track Recording
To create the above setup, we need to find a way to route all sources in such a way that each source is playing on a separate audio channel, so we can map each track on our DAW to record only that source. This will allow us, during the editing and mixing phase, to have full control over each track, so we can mute that barking dog of yours, or remove that sneeze coming from your guest over the music, etc.
If life was easy, this could have been done by simply arming each track of your DAW with a different source, but since Mac imposes a limitation of a single input and output device on Logic, we need to use some external help to create what is known as a “Virtual Aggregate Device”. This kind of device is a software generated device that can represent multiple inputs and outputs of individual devices, and turn them into a single device that can be selected by Logic as the input/output devices . This is where Loopback will come to save us. More on this later on.
Here is a typical list of sources you can record into your Podcast mix on Logic:
- Your local USB microphone
- A Music/SFX (sound-effects) player. Examples:
- Apple Music*
- Spotify*
- Farrago
- A browser playing music from YouTube* or any other internet source
- One or more remote guests coming over a VoIP (Voice over IP) communication tools. Few examples:
- Zoom
- FaceTime
- Skype
- WebEx
(* be aware of music licensing restrictions when using any music)
By combining all these sources into a single virtual device, we can point Logic to this multi-source virtual device, and record each source into its own track.
Again, we will get to the exact step-by-step soon, meanwhile, let’s move on to the next step, the infamous Mix-Minus configuration.
What is Mix-Minus, and Why?
Simply put, a Mix-Minus is the process of sending back an individual mix to each participant, that includes the master mix minus their own sound.
Let’s visualize this.
For the following example we will assume a setup of 4 entities:
- A local USB microphone (yourself)
- Remote Guest #1
- Remote Guest #2
- A local music source (e.g. Apple Music, Spotify, a YouTube tab in your browser, etc.)
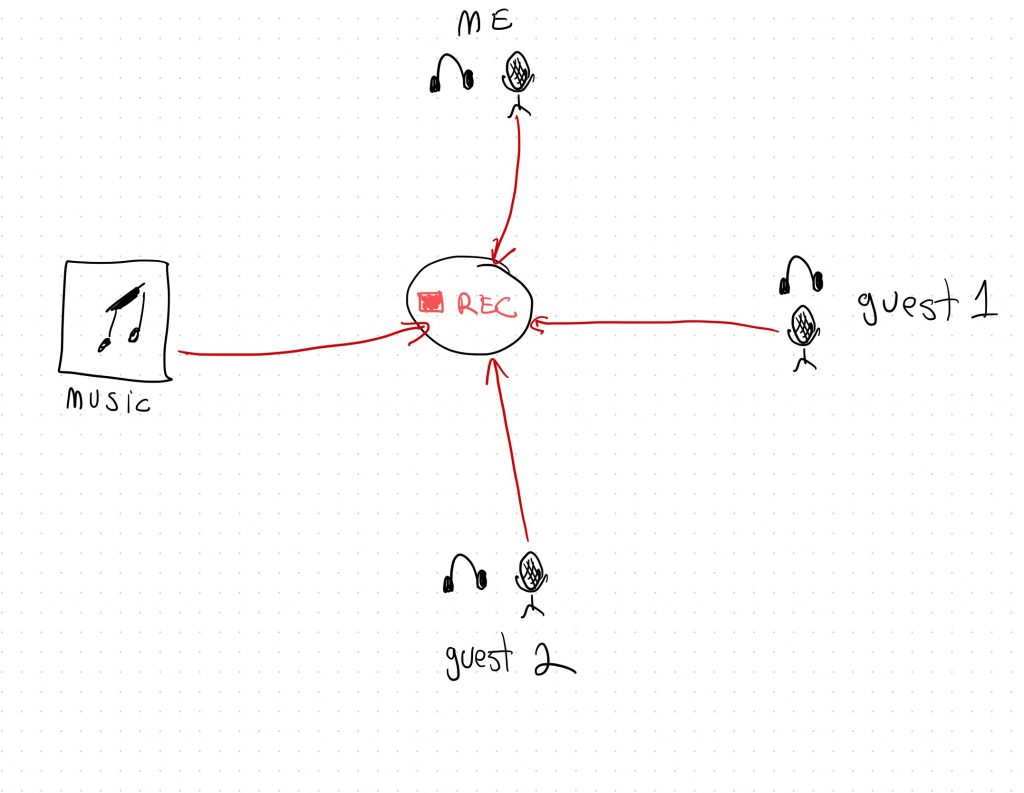
Assuming that the above is the setup for recording, let’s break it down to the individual mix-minus setups.
For yourself, you want to hear everything except for your own microphone:
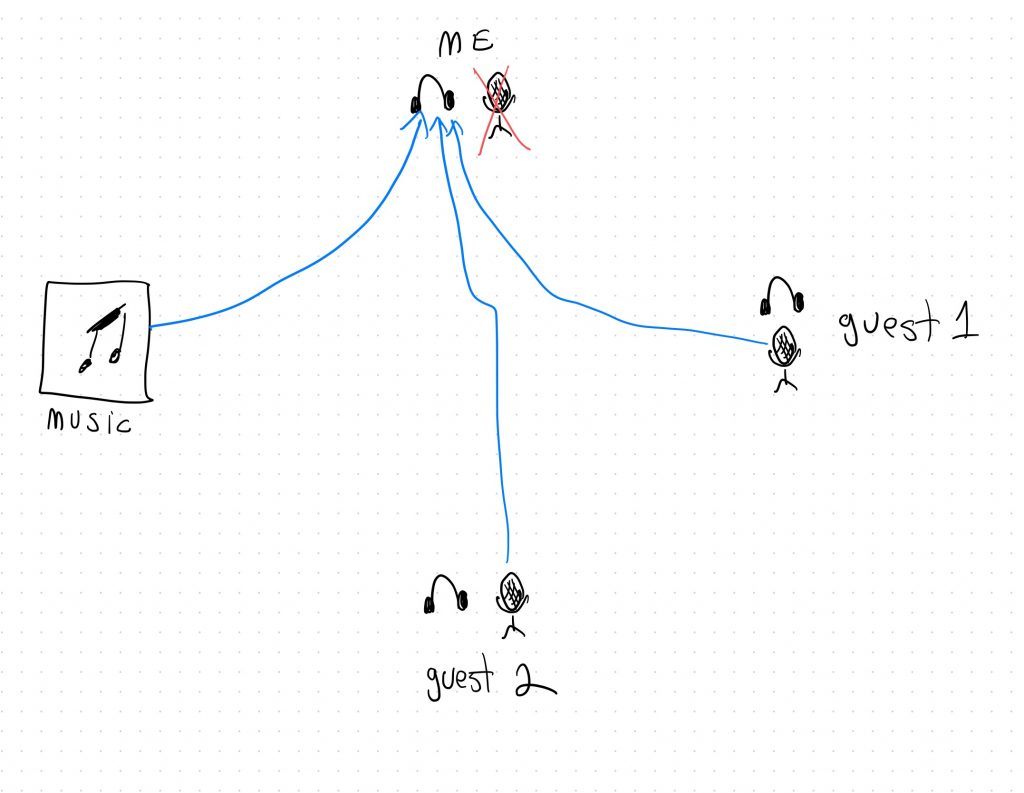
For Guest 1 and 2 you would expect these two mix-minus configurations:
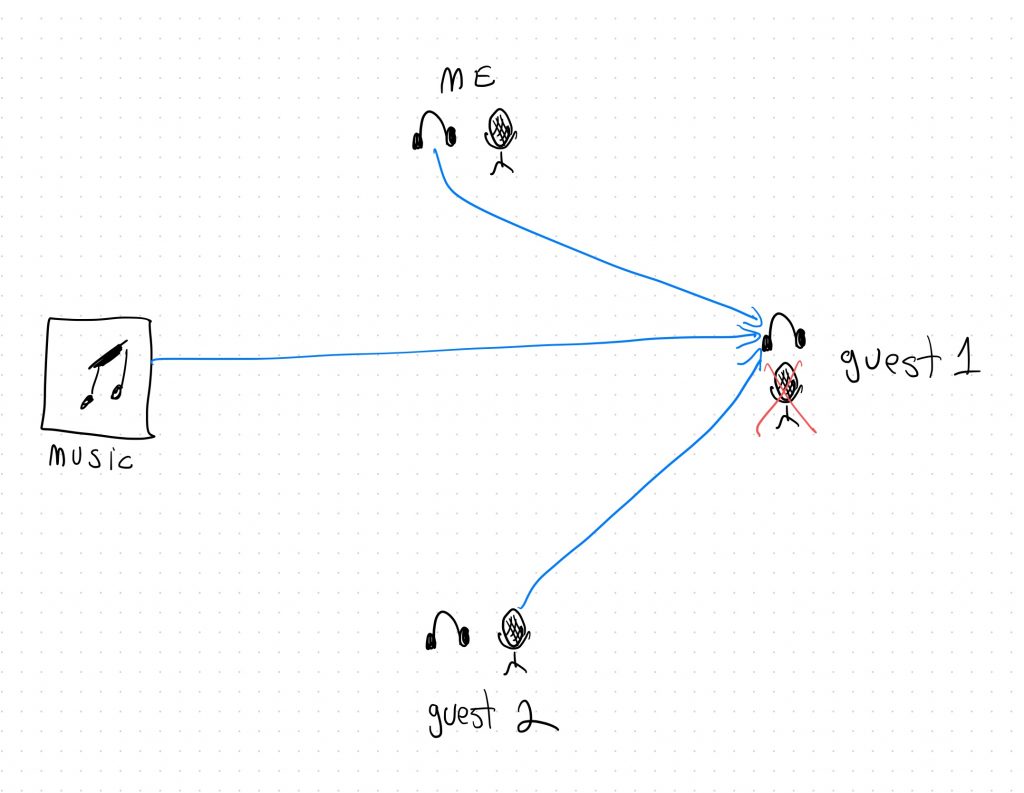
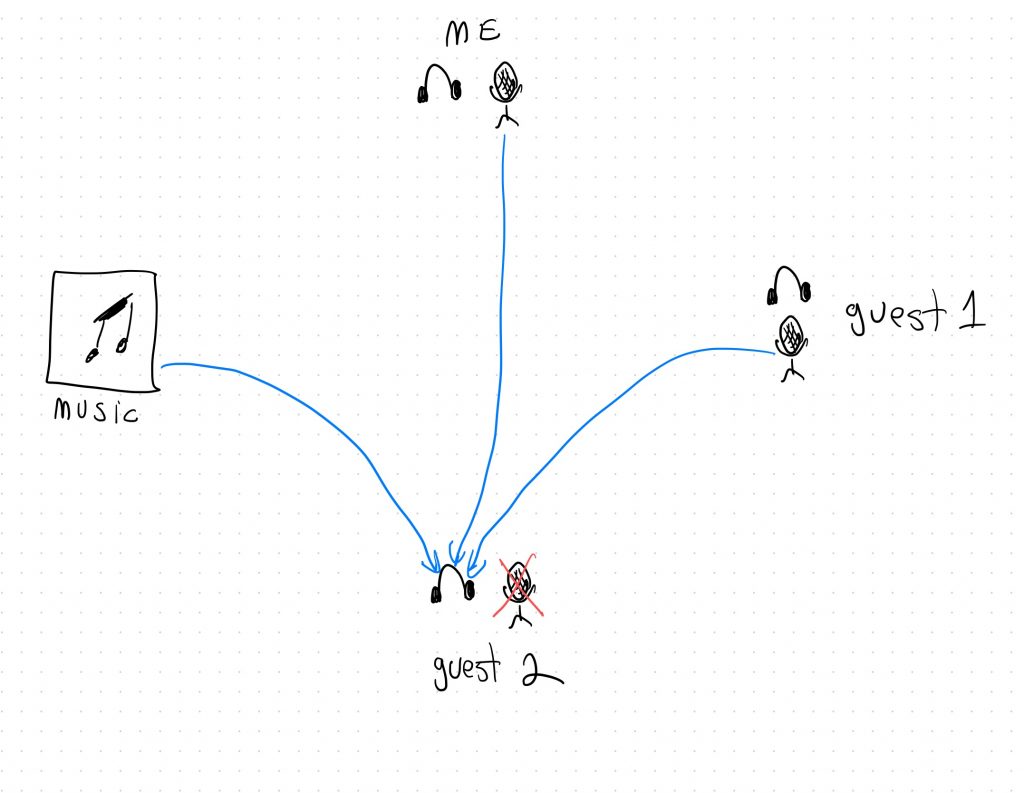
As you can see, each of the two guests receive the sound of the other sources except of their own microphone.
Since the music player is not “listening in” on the conversation, it doesn’t require a mix-minus back to it (one less thing to worry about 😅)
If we try to overlay these all into a single diagram it would look like this:
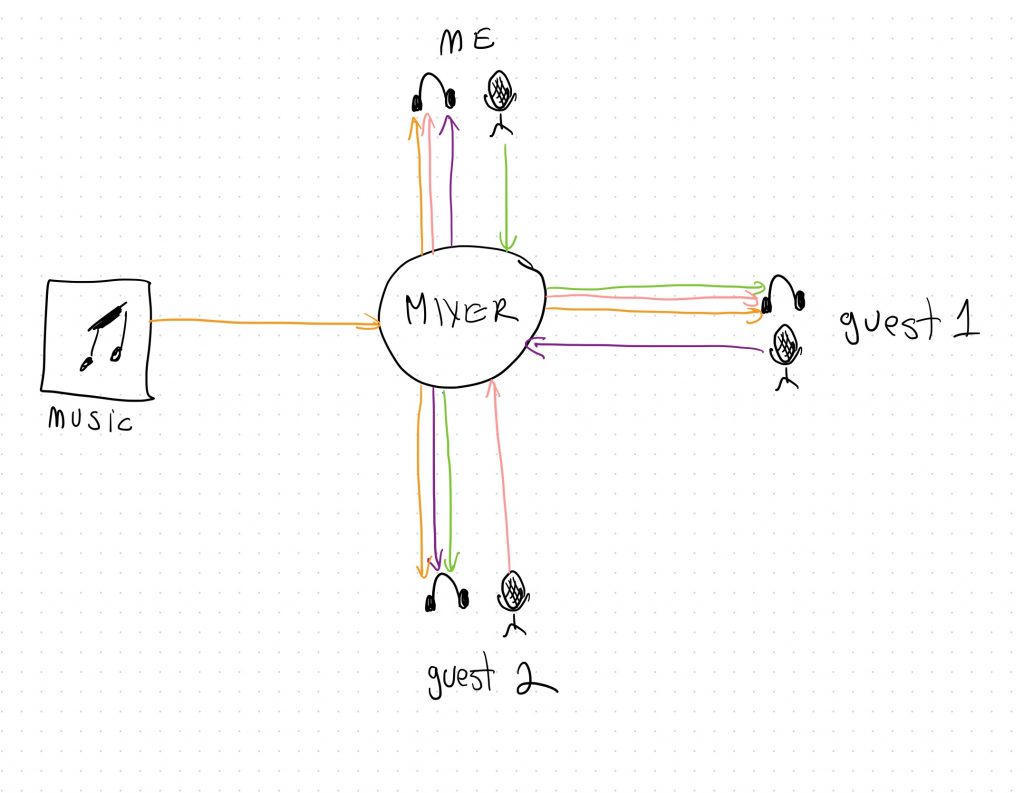
As you can see each source (music, your own mic, and the two guests’ mics) are all sent to all other people, but each does not receive their own mic sound back.)
As long as the “mixer” (Logic Pro X) is recording each input individually, and sends each guest a “custom” mix of all these tracks minus their own microphone, we are done.
Now that we get the theory, let’s get to the hands-on part, and start implementing this.
Let’s make this happen!
Disclaimer: This tutorial is specific to Logic Pro X, and depends on Loopback 2 by Rogue Amoeba, both available only for macOS. There are similar tools for an MS Windows, and this concept can be translated for a Windows environment, but this is beyond the scope of this tutorial. If you are a Windows wizard and you managed to configure this on Windows and would like to share, I would be more than happy to link to your solution. Hit me through the comments section.
Pre-requisites
- Latest macOS with up-to-date Logic Pro X installed
- Loopback 2 by Rogue Amoeba compatible with your version of macOS.
Part 1: Setup multi-track recording
To make the process easy, we will do the recording part first, and later on add the mix-minus setup on top of it.
The first challenge with Logic Pro X, is that Logic is inheriting the macOS limitation of supporting a single input device at a time. Also, it can only recognize physical connected devices such as a USB microphone, a USB audio interface, and similar, but not software sources such as Spotify, or YouTube running in a browser. In order to record the output of an application (be it Spotify, or a communication tool such as Zoom or FaceTime), we need some help. This help comes in the form of Loopback.
What is Loopback?
In short, Loopback is a “magical” piece of software that allows you to take control over audio on your computer, and route sounds generated by any sound source however you like. E.g. grab your USB microphone, your Zoom output, and your YouTube player, and turn them into a single device with all these sources as individual channels.
In our case Loopback is used to create 3 types of devices:
- Combines all audio sources into a single “virtual device” so we can use it as the input device for Logic, and record each source into its own individual track.
- Create a virtual multi-channel output device, so we can output the individual mix-minus mixes back out of Logic into each remote guest’s session.
- Create a set of individual Mix-Minus “virtual microphone/speaker” devices for each of our communication apps like Zoom, FaceTime, etc., to be used as their microphone input and speaker output device.
This might still sound confusing at this point, but this will all make sense soon.
For this tutorial, we will assume the following scenario:
| Source | Physical/Application |
|---|---|
| Microphone (me) | Physical USB |
| FaceTime (Guest 1) | Application |
| Zoom (Guest 2) | Application |
| Spotify (music) | Application |
Let’s group all these into a single input device that Logic can use.
Launch Loopback and get ready to add some virtual devices.
Create a “Speaker” virtual device for Zoom:
Click the “New Virtual Device” and name it “Zoom Speaker Mix(-)“
It should already have a default “Pass-Thru” and an output stereo channel configured, so nothing more to do here.
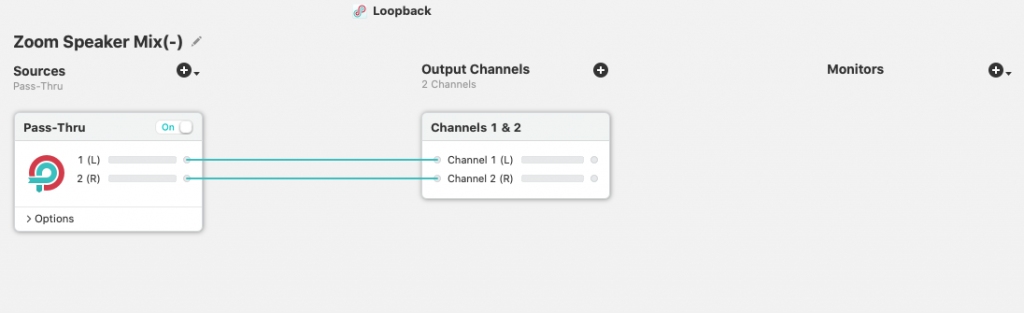
Repeat this for any additional applications you might want to use such as FaceTime, Skype, WebEx etc.
Create the Logic’s Input virtual device:
- Click the “New Virtual Device” button, and name it: “Logic X Input Mix(-)“
- Remove the default Pass-Thru device (we don’t need it for this device)
- Click the (+) button on the source column and add the following sources:
- Zoom Speaker Mix(-)
- FaceTime Speaker Mix(-)
- Your USB microphone
- Spotify (you need to install the desktop version of Spotify for this to show, otherwise you can add your browser and play it through there)
- Next, click the (+) in the Output Channels column and add one for each input you have (you should have at least 3 if you set it up as above, or more if you added more applications.
- Remove any connectors lines that have been automatically added by Loopback so we can setup our own set of connectors.
- Connect each input to a single output channel as shown in the example below.
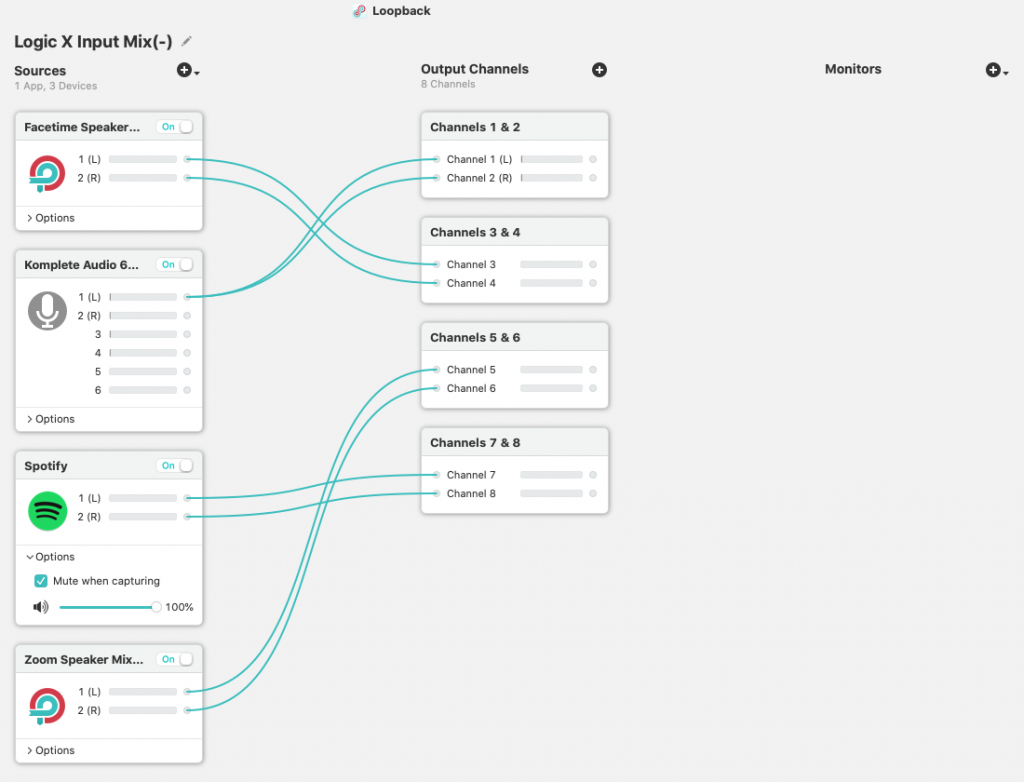
Note that Loopback orders the sources by name, but you can reorder the outputs routing to match whatever order makes more sense for you. E.g. I like to have my microphone be the first output, my Spotify last, and my guests in the middle one after another…
Also note that since my Microphone is a mono mic, I chose to route it to both the L/R channels of its Output Channel.
Now what you have is your Logic virtual input device that combines all your sources mapped into a set of 8 or more individual pairs of channels.
Configure the communication apps
You now need to configure your communication apps (Zoom, FaceTime etc.) to use their virtual speaker devices as the speaker to connect to.
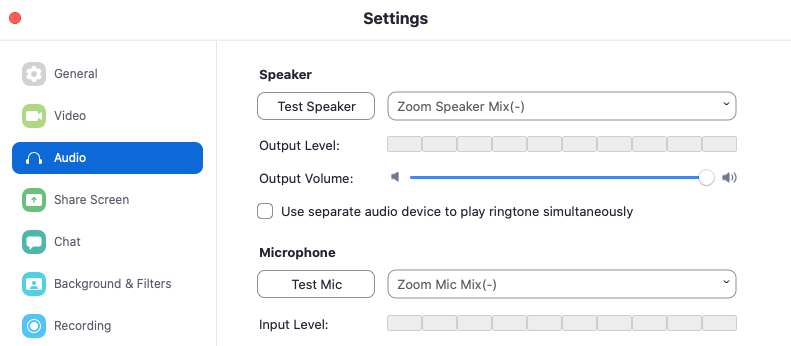
Here is an example for Zoom:
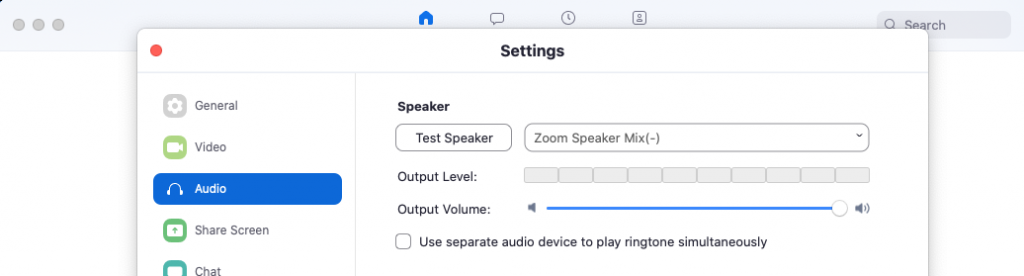
By navigating to Zoom’s audio configuration, change your default speaker output to the new “Zoom Speaker Mix(-)” virtual device we have created in Loopback.
To quickly test that the Zoom configuration works correctly, hit the “Test Speaker” button and watch the flow of the sound between Zoom, to the “Zoom Speaker Mix(-)” to the “Logic X Input Mix(-)” devices

Note: you might not hear anything through your headphones/speakers, but if the meters are “dancing” in sync you are all set.
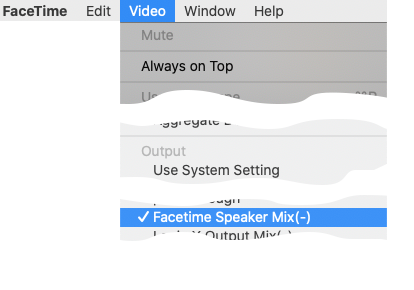
Configure FaceTime output
If you also configured a virtual device for FaceTime, launch FaceTime on your Mac, and set its output to the dedicated virtual device by going to the Video menu, and selecting the “FaceTime Speaker Mix(-)” as the Output:
Bringing it all into Logic
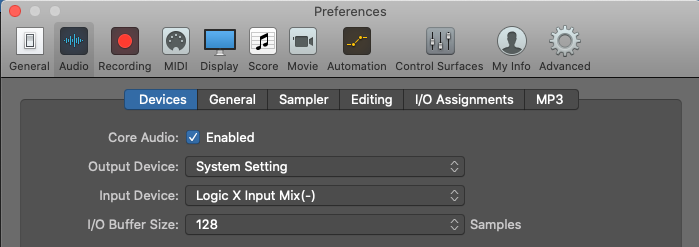
Launch Logic, start a blank audio recording project and configure it as follows:
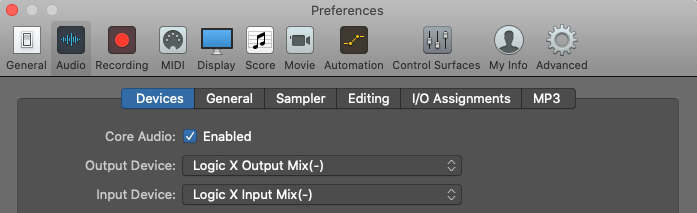
- Open preferences -> Audio
- Select “Logic X Input Mix(-)” as your Input Device (leave the output as is for now, we’ll get back to it soon).
- Add new audio recording tracks for each input (Mic, Zoom, Spotify, etc.)
- Update the input of each to match the mapping in your Loopback virtual device.
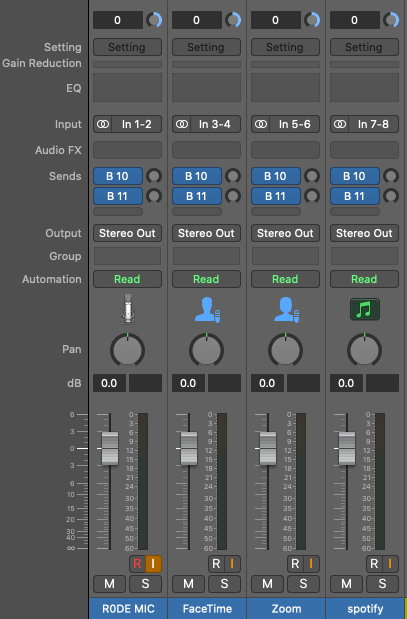
Here is an example of my setup with the local Mic, Zoom, FaceTime, and Spotify.
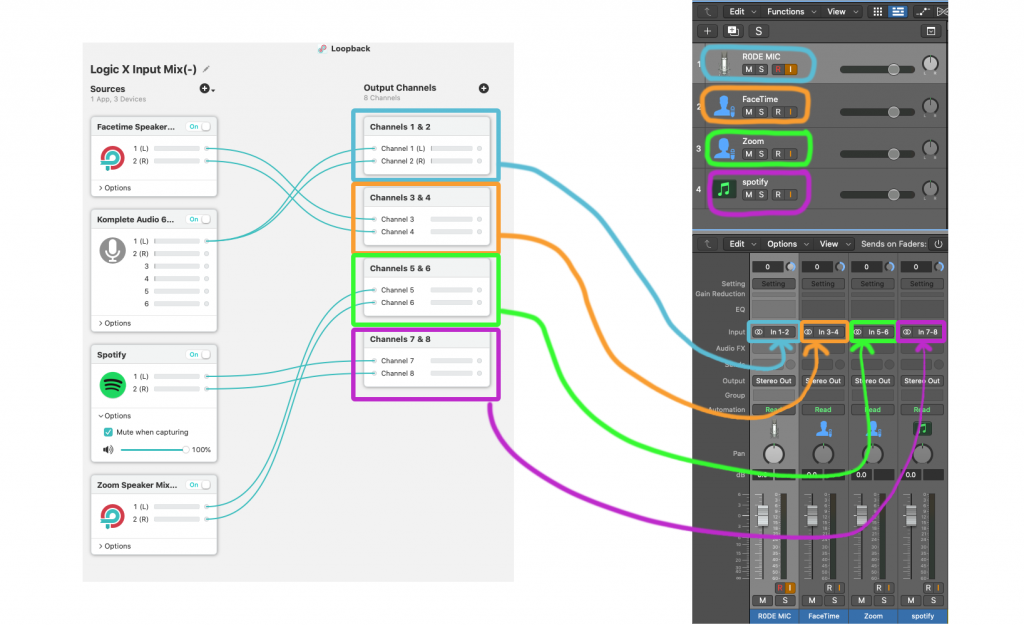
As you can see above, after adding the 4 tracks, I have set the input of each to match the relevant output. I also renamed them to help me tell them apart, and change their icons to help me know what source each one of them represents.
At this point you can start recording a multi-track sessions, but, it will be hard to monitor it, because you can’t hear anything yet.
If you arm all the tracks (hit the R icon), and also hit the Monitor button (I button), you will be able to hear all your sources playing and if you run a recording test, you will see that each track is recording its individual input and later on you will be able to edit them individually.
Part 1 is complete, the multi-track recording is configured. Next to the monitoring phase, and creating the individual mix minus tracks for each.
Configuring the Mix-Minus devices
In order to configure a mix minus, we need to add two sets of new virtual devices in Loopback:
- A “catch-all” single output device for Logic, to allow us mapping each guest’s mix into its own channel. We will name it the “Logic X Output Mix(-)” device
- A set of individual pass-thru devices for each communication application (Zoom, FaceTime, etc.) to route their specific output from the above device to their input.
We will then be able to configure Logic to create the individual mix-minus outputs.
Let’s get started.
- Back in Loopback create a new Virtual Device, and name it: “Logic X Output Mix(-)”
- Leave the default Pass-Thru source device, we will use it in just a moment.
- In the Output Channels columns, add additional Output Channels for each guest. E.g. if you have yourself, a Zoom guest, and a FaceTime guest, you should have 3 Output Channels added.
- You will notice that Loopback automatically add outputs to your Pass-Thru source, and map it to each output. This is great for us and we will keep it as is.
- Next, add one monitor in the Monitors column, and choose your preferred local speakers (e.g. your built-in Headphones, your USB output, etc.). This will be the device through which you will listen to your local mix as you record the session. Tip: You want to work with headphones to avoid any spill of the other sounds into your track.
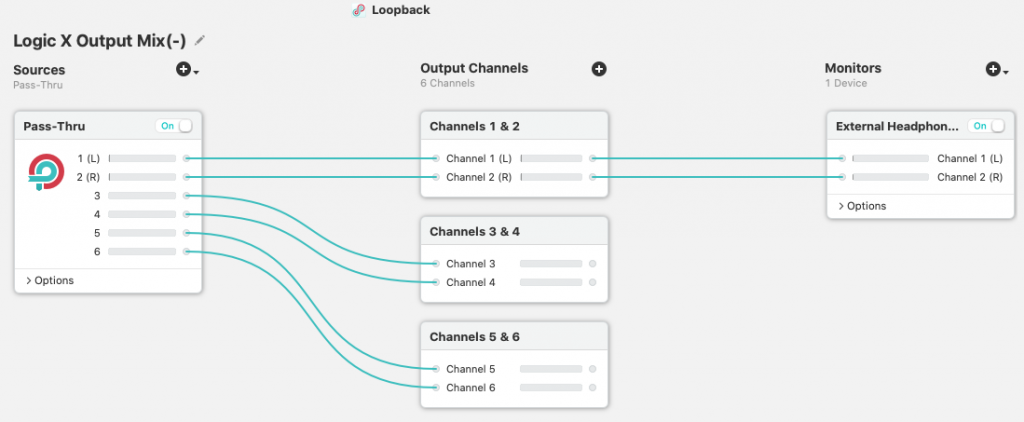
In the example above I have created a setup with 3 stereo output sets, the first of which is connected to my local headphones for monitoring.
Choose which of the output channels is going to be used for each of your VoIP applications. Let’s assume that Outputs 3 & 4 will be for FaceTime, and 5 & 6 for Zoom.
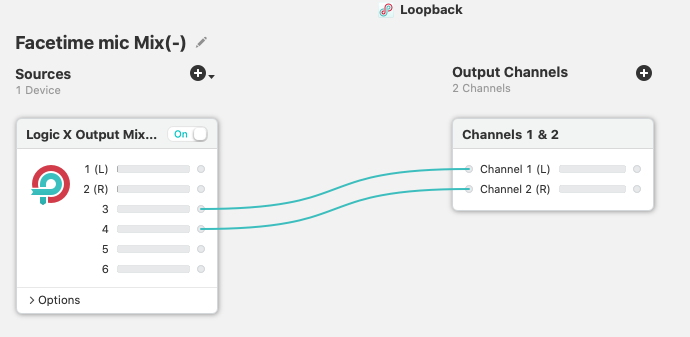
Go ahead and create two new Virtual Devices in Loopback and name them FaceTime Input Mix(-) and Zoom Input Mix(-).
Open the new FaceTime Input Mix(-) virtual device, and remove the default Pass-Thru device. Instead, select from the source the Logic Output Mix(-) device
delete the default connectors added by Loopback, and instead drag two connectors from output 3 & 4 (the ones we dedicated for FaceTime above) to the default L/R output channels
Repeat the same in the Zoom Input Mix(-) device, but this time use channels 5 & 6 to be mapped to the default L/R Output Channel.
Your new devices should look like this:

Back in FaceTime and Zoom select these two new devices as the relevant Microphone/Input
The same is true for FaceTime, select the new FaceTime Input from the Video dropdown menu.
Finally, let’s get back to logic and complete our Mix-Minus setup.
Go back to Logic’s Preferences Audio setup, and replace the Output to our new “Logic X Output Mix(-)” device.
NOTE: Logic will automatically replace your input to match the newly selected output. You have to manually reselect the input to be the Logic X Input Mix(-) device.
Next, let’s configure the individual outputs for each mix-minus by using the audio busses.
If you are not familiar with the concept of a bus in audio, a bus is a way to route a copy of any track into another track. Usually this is used to send a copy of the track to an effects channel, but, it is also very useful for exactly what we are about to do here, create virtual mixes (mix-minus) and send each to a different output channel.
So let’s get started.
Creating bus channels for each output
As a reminder in our example we have a total of 3 pairs of stereo outputs. In Loopback we assumed that channels 1 & 2 will be our local stereo L/R monitor (aka our headphones), 3 & 4 will be our FaceTime mix-minus and 5 & 6 will be our Zoom mix-minus.
To configure this, make sure your mixer is showing in Logic (hit the X key if it is not showing) or the mixer icon on the top nav bar.
Below the input assignment section, the one we used to assign the inputs, right after the empty “Audio FX” option, there is the “Sends” section. If you click on the empty gray area of the track’s Sends option, it will show a menu. In this menu, you can choose what BUS to send this track to. I like my Mix-Minus bus number to start with bus 10. So go to your first track (the local Microphone if you followed my example), and send it to bus 10. You will notice that a new Aux track was added to the mixer.
Right below the newly added send, click the small gray area to create an additional Send and send it to Bus 11. Repeat for all sources.
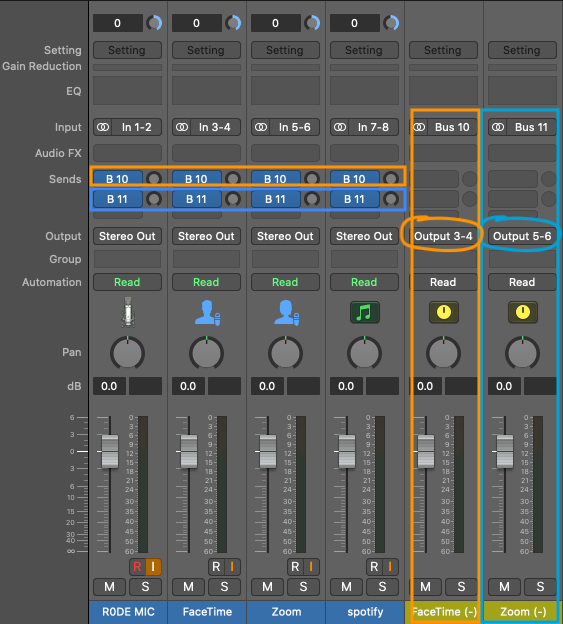
It should now look like this:
The newly created send tracks are automatically named Aux 1 and Aux 2. Go ahead and rename them to FaceTime(-) and Zoom(-) respectively.
Then change their Output from “Stereo Out” to channels output 3-4 for FaceTime (-) and Output 5-6 for Zoom (-).
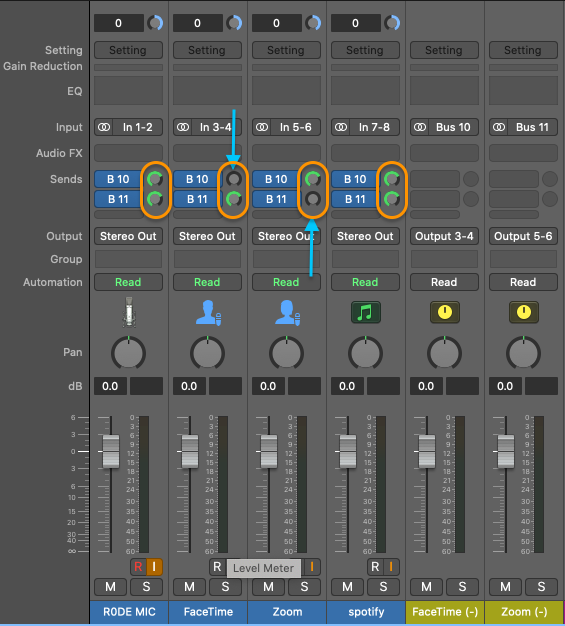
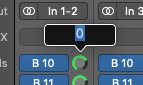
At this point, we are almost done but if you’ll test this, it will not work, because our sends are, by default, set to send nothing. Go head and click the small knob button right of each send button (the four B 10, and B 11 sends) and set their volume to 0db to keep them at a natural volume.
And here is the “mix-minus” part: Keep the send to 0 for sending to self.
Notice the two blue arrows below that show where FaceTime is not sending to the FT bus, and Zoom is not sending output to the Zoom bus. This is the whole idea of the Minus in the Mix-Minus!!!
Tip: you can quickly edit these send values by double-clicking the knob and entering the number using your keyboard.
Technically we are done. All that is left to do is test.
In order to run a test recording ARM (R button) all input tracks, and hit the I button on the same tracks to monitor the output through your headphones (do not monitor your own Microphone if you are not using headphones, which you probably should because you are a pro! 👍
Play some music on Spotify (or your other selected music source,) and start a zoom and/or FaceTime call.
As you start recording, you will get 4 individual tracks being recorded, each with its own dedicated input, recorded into its own individual track.

Interacting with the Mix-Minus
During the recording you can adjust the mix minus to fit your guest’s needs:
- Change the overall volume of what is sent to them by changing the main level of the relevant Aux channel (Zoom – or FaceTime -).
- Increase/decrease individual sources by adjusting their send level for that specific bus (e.g. lower the music send to your guests by pulling the send level down on the Spotify track).
Troubleshooting
It may well be that things will not work smoothly on first try.
Here are some common things to do in order to troubleshoot typical issues:
Problem: I can’t hear the music from Spotify/Music etc.
Solution: make sure that they are mapped in Loopback as a source device and mapped to the correct Output Channel in your virtual Logic Input Mix(-) device.
Problem: One or all of my VOIP clients (Zoom etc.) do not pick up the audio from Logic:
Solution: Try one of the following:
- Make sure that your VOIP app is configured correctly with its output sent to your Virtual output device, and their input is set to their relevant input virtual device
- Make sure that the mix-minus AUX track in Logic (the one that has the input set to the bus 10 and up) is configured to output to the correct output channels of your Logic Output Mix(-) device
Summary
This was a lot to read, and a lot to learn, and a lot to do. This post was almost completely rewritten from scratch, in an attempt to make this as easy to follow as possible. If you have any questions, suggestions or if you noticed any errors, please feel free to send me a message in the comments section and I’ll do my best to try and help.
The images don’t appear to be available for this otherwise very helpful blog. Any chance you might make those available?
Oops, fixed.
All the pictures is missing!
Thanks for the note. Fixed.
I have tried and tried this set up, but nobody, in any application like Skype, Zoom, Linphone or Facetime. If i choose podcast aggregatetd device as output they can hear my mic, but no sound from other channels in to Logic. Could anybody please help me a bit. i can be contacted by Facebook Erik Hattrem or mail erik.hattrem(a)gmail.com
The Aggregate device should only be used in Logic. All other tools should use their individual virtual devices. E.g. for Zoom you should have two virtual devices configured: a Zoom output and a Zoom Mix-Minus (if you followed the names in the post). So in Zoom you should choose the Zoom Output for the output of Zoom and the Zoom mix-minus for the input of Zoom.
Hi, thanks a lot for posting this great material.
I have problems configuring Zoom, for some reasons I cannot manage to get the mix minus output to zoom’s input,
David, please check this new version of the post. It should be working with your new Loopback version.
Hi,
This is an excellent explanation…….although I’m an experienced logic user.. this has taken me into uncharted territory.!!!
So I’ve followed everything through…using a newer version of loopback than your picture but I’m struggling with facetime. So the main focus of this attempted podcast is via facetime. I’ve got the facetime mixminus for facetime input and facetime output from output. but try as i might i can get nothing on the facetime track in logic
Thanks for the feedback Felix. Yes, I learned that the newer version of Loopback works differently and can simplify this process a lot. I have an action item to update this blog to reflect the newer capabilities of LoopBack.
Great….Having had an email back from Rogue Amoeba yesterday it looks like you can use loopback audio instead of an aggregate device now….doesn’t it?
Correct.
well all I can say is…….looking forward to your update!!
Ok…so in the meantime can you confirm that you still need to set up the mix minus virtual devices in loopback so that you can use the bus set up in the same way in logic?
Felix, please check out the new edit of this post. It should answer all your questions. Let me know if you are still in need of help on how to configure a working mix-minus setup.
this is terrific, many thanks. One thing I’m not clear about, does the remote person have to have loopback themselves, or can they just Zoom as normal?
Good question, the remote person should not worry about this at all. They just use Zoom normally.
Thank-you for sharing this wonderful information. Is it also possible to set up a mix-minus in the free version of Cleanfeed? If so, could you please provide these details, too?
I don’t think you need this setup with Cleanfeed. I’ve never used it, but seems like Cleanfeed is a one-stop-shop for your remote recording, and they claim they record into separate tracks, so you should be able to import these into individual tracks of your favorite DAW and edit/mix it as you wish.
Thanks for your reply. Yes, that’s correct. In the paid version (called “Pro”) it is possible to record into separate tracks. With the free version, everything is output as one stereo track.
I see, so in that case, if you still want to have the separate tracks, you will need to use the above method instead of Cleanfeed.
Hi one more question. i have it all working but two issues. For it to work I need to have the monitor on both the tracks I’m listening to which gives me a bit of echo, not a real problem, but better if not. And the other thing is, for some strange reason the FaceTime and Zoom calls are super loud, even when I take the sends on the buses right down and pull the ‘leavers’ down on the mixer.
For the volume, try to lower the gain on these inputs and see if it works.
As for the echo: if you routed it all correctly and you are using headphones usually you shouldn’t hear any feedback. If you still hear feedback, I suggest you walk through all lines.
Also, unless you want to hear yourself while talking, you don’t need to turn the monitor (‘I’) on your own mic channel.
Thanks. I’ll try those things. I must have something wrong because if I take the monitor (I) off, the people on the call can’t hear me. Should my mac (from the top volume toggle) be set to Rode- A1, my mic which my headphones come out of, or Logix X output mix?
The people on the call should hear you through the sends. If you want them to hear you, you have to turn the send to their mix-minus of your mic.
As for your main sound settings, it doesn’t really matter, as long as your headphones are mapped to what you set as your monitor in Loopback (the 3rd column).
Hi, this was a really useful page, and I used it to set everything up. I hit a snag when recording a VO client though, as using the monitor function on Loopback causes a certain amount of latency, which I need to avoid. Setting up an aggregate device seemed to be the best way of doing it through Logic, so all monitoring is done inside Logic. I put together a blog and diagrams (mainly to remind myself!) , if it’s useful for anyone – https://www.rocinantestudios.com/blogs/recording-and-skype-conversation