I wasn’t always making Hummus at home. Growing up in Israel, I learned to appreciate great Hummus. No, not that HaaS/HaaD (“Hummus-as-a-side”/ Hummus-as-a-dip), but rather Hummus as the hero, the main dish, the start, middle, and end to my whole meal!
Hummus as the Hero
They stand in line for Ali Karavan (Abu Hassan) Hummus in the Jaffa old city, south of Tel-Aviv
I’m talking about the Hummus that people stand in line for, like Abu Hassan (aka Ali Karavan) in the old city of Jaffa, south of Tel-Aviv, and many others in other parts of the country, like Acco (Acre), Haifa, and of course Jerusalem.
Since 2005, when I moved to the US, I’ve been searching for the perfect Hummus dish, and with the exception of a few rare places that are not in my area or even state, I’ve found nothing.
After a couple of years, I started the journey of searching for a recipe and mastering the art of making the perfect plate of Hummus, at home.
I’ve tried countless recipes, ideas, and ingredients, and it wasn’t until about 7 years later that I found my “hero” recipe.
Here is what I learned:
The most important ingredient is actually the Tahini, which affects the flavor.
The 2nd most important ingredient is using fresh lemon juice, and a lot of it! 🍋🍋🍋🍋
The beans are only 3rd. They should be of good quality and thick, but I found that beans from a can are the fastest and most consistent way to get from craving Hummus to eating it. Yet, if you want to cook your own beans, you can follow my recipe and start from dry beans. Just remember that this requires about 24-48 hours of prep time, between soaking, cooking, and cooling.
Don’t get me wrong, I’m still in love with the Abu-Hassan hummus and especially their Messabacha dish. My recipe doesn’t claim to be even close to putting his throne at risk, but what I achieved here allows me to have a tasety Hummus lunch or dinner a few times a week at home without feeling sad! (Let’s face it, I eat hummus every day, just like the stereotypical Israeli man I am!)
So here it is, I give you my Step-by-step guide to make an Israeli-style Hummus, a one that is as close as I could get to my beloved Hummus from back in Israel.
Raz’s Hummus Recipe
Prep time: ~60 minutes
Serving Size: ~2.5 Lbs
Ingredients
~2lb (~950g / 3-4 cups) of cooked beans (see my recipe), or for a “lazy”/ fast prep, use 2 x Cans of cooked beans (I really like the SAHADI Chickpeas (buy), but almost any can of cooked beans should work)
1 x Cup raw Tahini (I love the Al Wadi Tahina (buy), but others swear by Har Bracha, Al Arz, or HaYona.
~1 x Cup ice cubes (or 3/4 cup of extra cold water)
Salt (~1 teaspoon)
Cumin (pinch)
3-4 x Garlic Cloves
3-4 x Lemons
Baking Soda
Making the Hummus
Once the beans and lemon juice are ready, we can move on to the final step.
Rinse the beans one last time, getting rid of any leftover floating shells. Drain the beans to get rid of as much of the water. It is ok to have some shells left. Depending on the beans prep method, you probably got rid of most of them by now.
For the mixing phase, use a food processor with a lower metal blade, like this one
The recommend style of blade to use
Fill the food processor’s container with:
The beans (you may keep a small amount for decoration if you want)
💡Tip: when using store-bought beans from a can, I suggest giving a rinse in fresh water, then do a quick cook for 15 minutes, and rinsing them again, to bring them back to life, and avoid the canned beans aftertaste.
1 cup raw tahini (stir well first)
💡Tip: Do not remove or discard the inner film covering your tahini jar; Instead, punch a cross-shaped hole with the tip of a sharp knife, in the center of the film, and squeeze the Tahini through it. Cover with plastic wrap, and close the lid tightly. Store in your pantry upside-down to ensure the tahini is not drying up at the bottom of your jar.
½ – 1 tbsp salt (to taste)
pinch of cumin
The Garlic-infused lemon juice
💡Tip: How much lemon juice should you use? This is a great question and one that depends on personal taste. I like my Hummus on the soury side, so I use about ~3/4 cup, but you may tone it down or up to your liking. You can play with the ratio of lemon to water as well. For a start, maybe start with 1/4 cup and add more juice in future batches until you reach the flavor you like, or add it as you go and taste after you mix some more.
💡Tip: Emulsifying lemon and Tahini causes the mixture to hurden. This is why I add the lemon before I add water, to let the hummus texture begin to form, and only then, I add the ice/water to let it smooth out a bit.
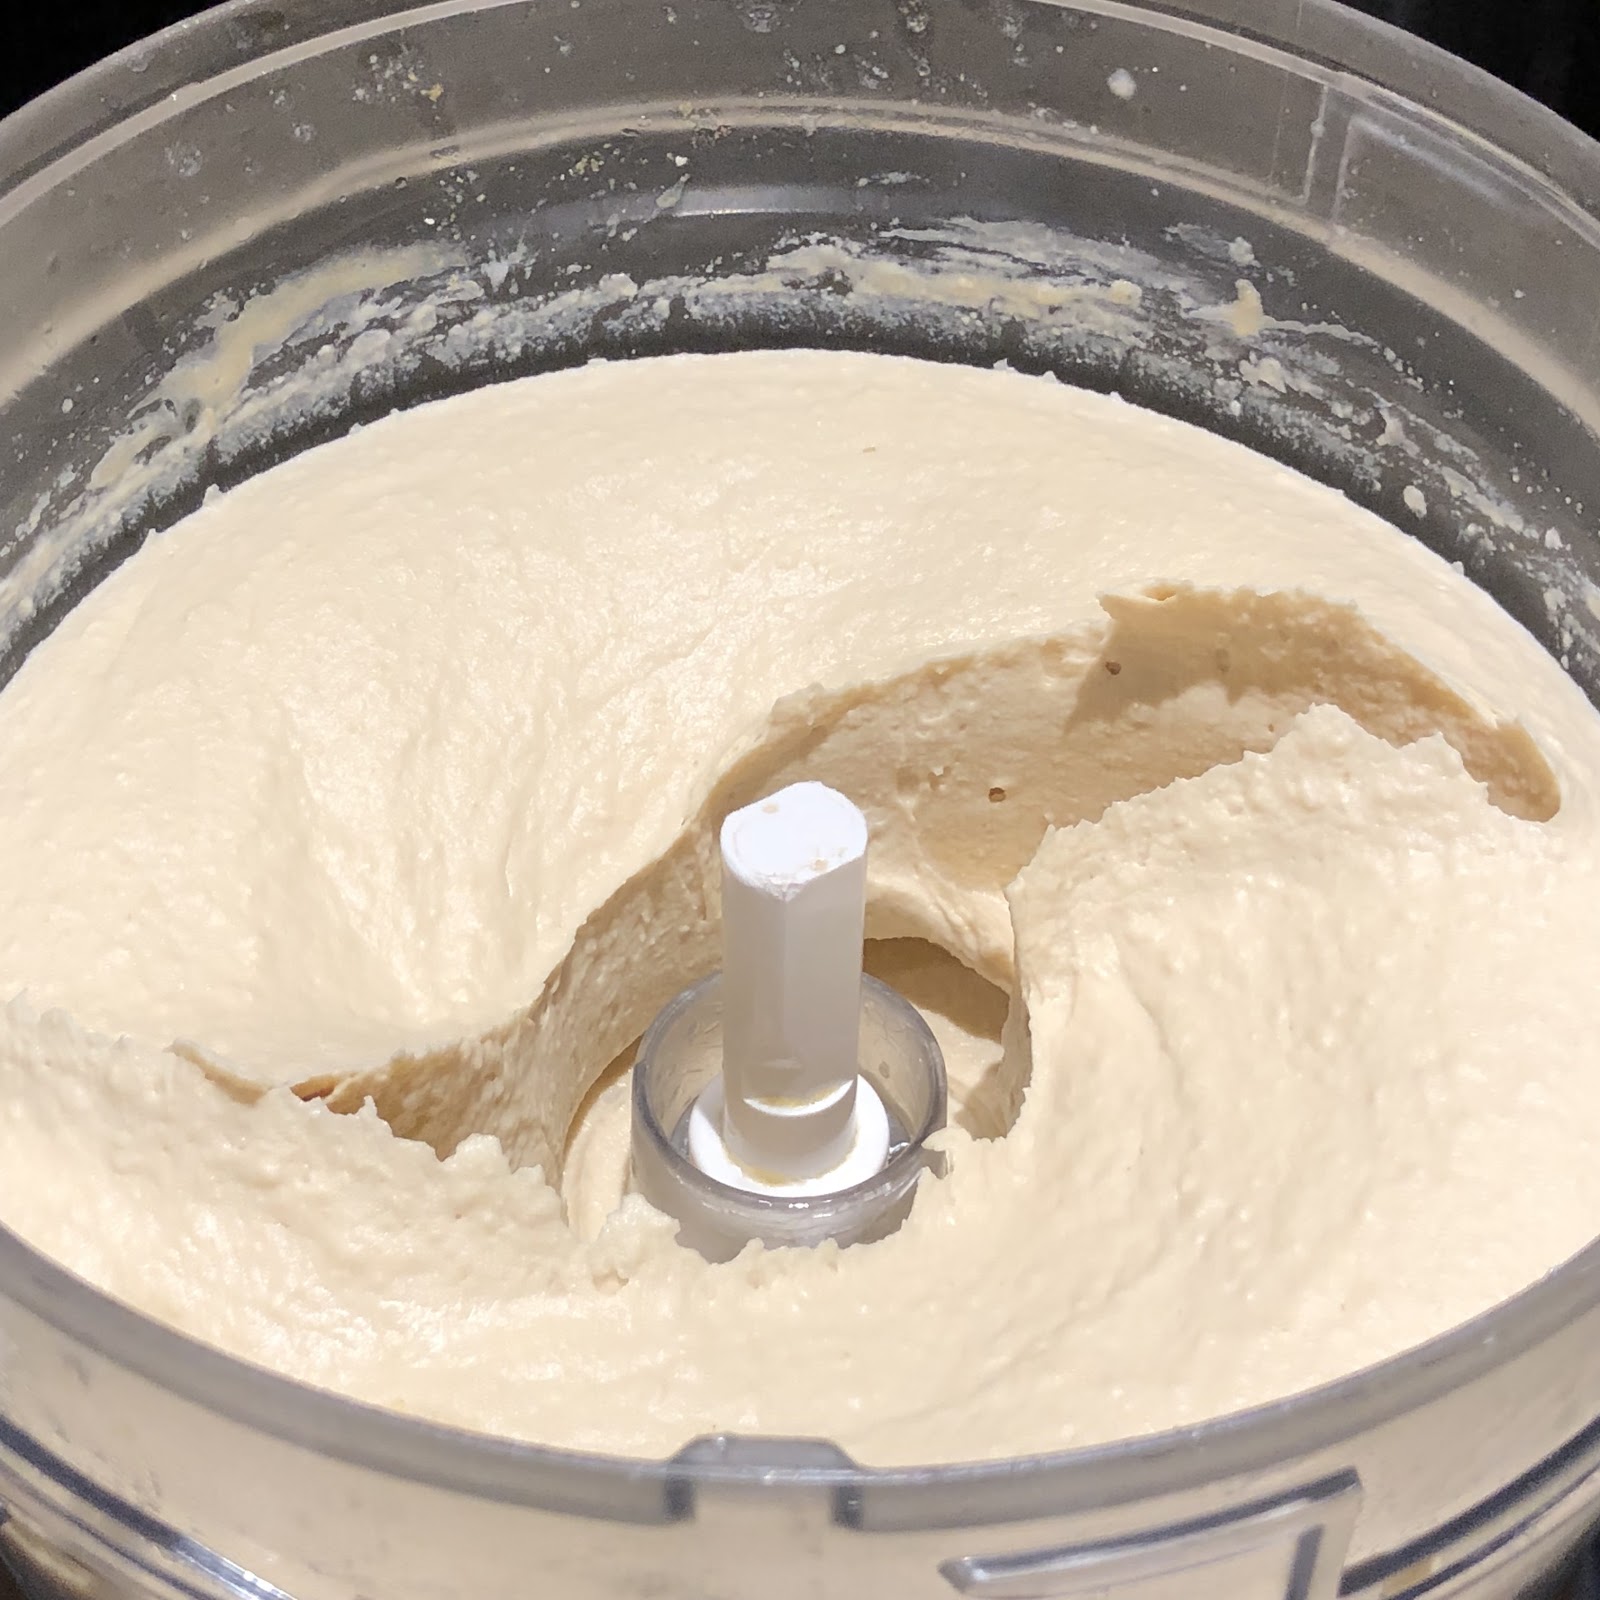
Start the food processor. Watch the texture of the hummus as it is being processed. Once the mixture is combined, and the tahini and lemon have emulsified, slowly add the ice cubes (1 cup worth, or ice-cold water) to achieve the desired consistency. A good Israeli-style hummus is silky smooth yet firm enough so that when the blade is taken out, the hummus stands still in the container (see photo below). Stop and taste. You can add more of the spices as you see fit.
Once the mixture and ice are integrated, slowly drizzle the ½ cup of olive oil, if you don’t have a slow-drip in your food processor, just slowing drizzle it in manually.
Let it run for at least 10 minutes for an extra smooth result.
Once you are happy with the taste, keep running for 2-3 minutes just for extra measure… 🤓
Stop the food processor and check the consistency of the Hummus, and flavor. If you have brought it to the right level, once the blade is removed, the Hummus should stand still, as shown in this photo.
This is the expected firmness once the blade is removed
Move the Hummus to a container and refrigerate.
💡Tip: to avoid “crust” building up on top, cover the Hummus with plastic wrap, pushing it close to the surface, and then close the lid, before placing in the fridge. You can discard the plastic on first use once the Hummus is already chilled.
💡Serving Tips
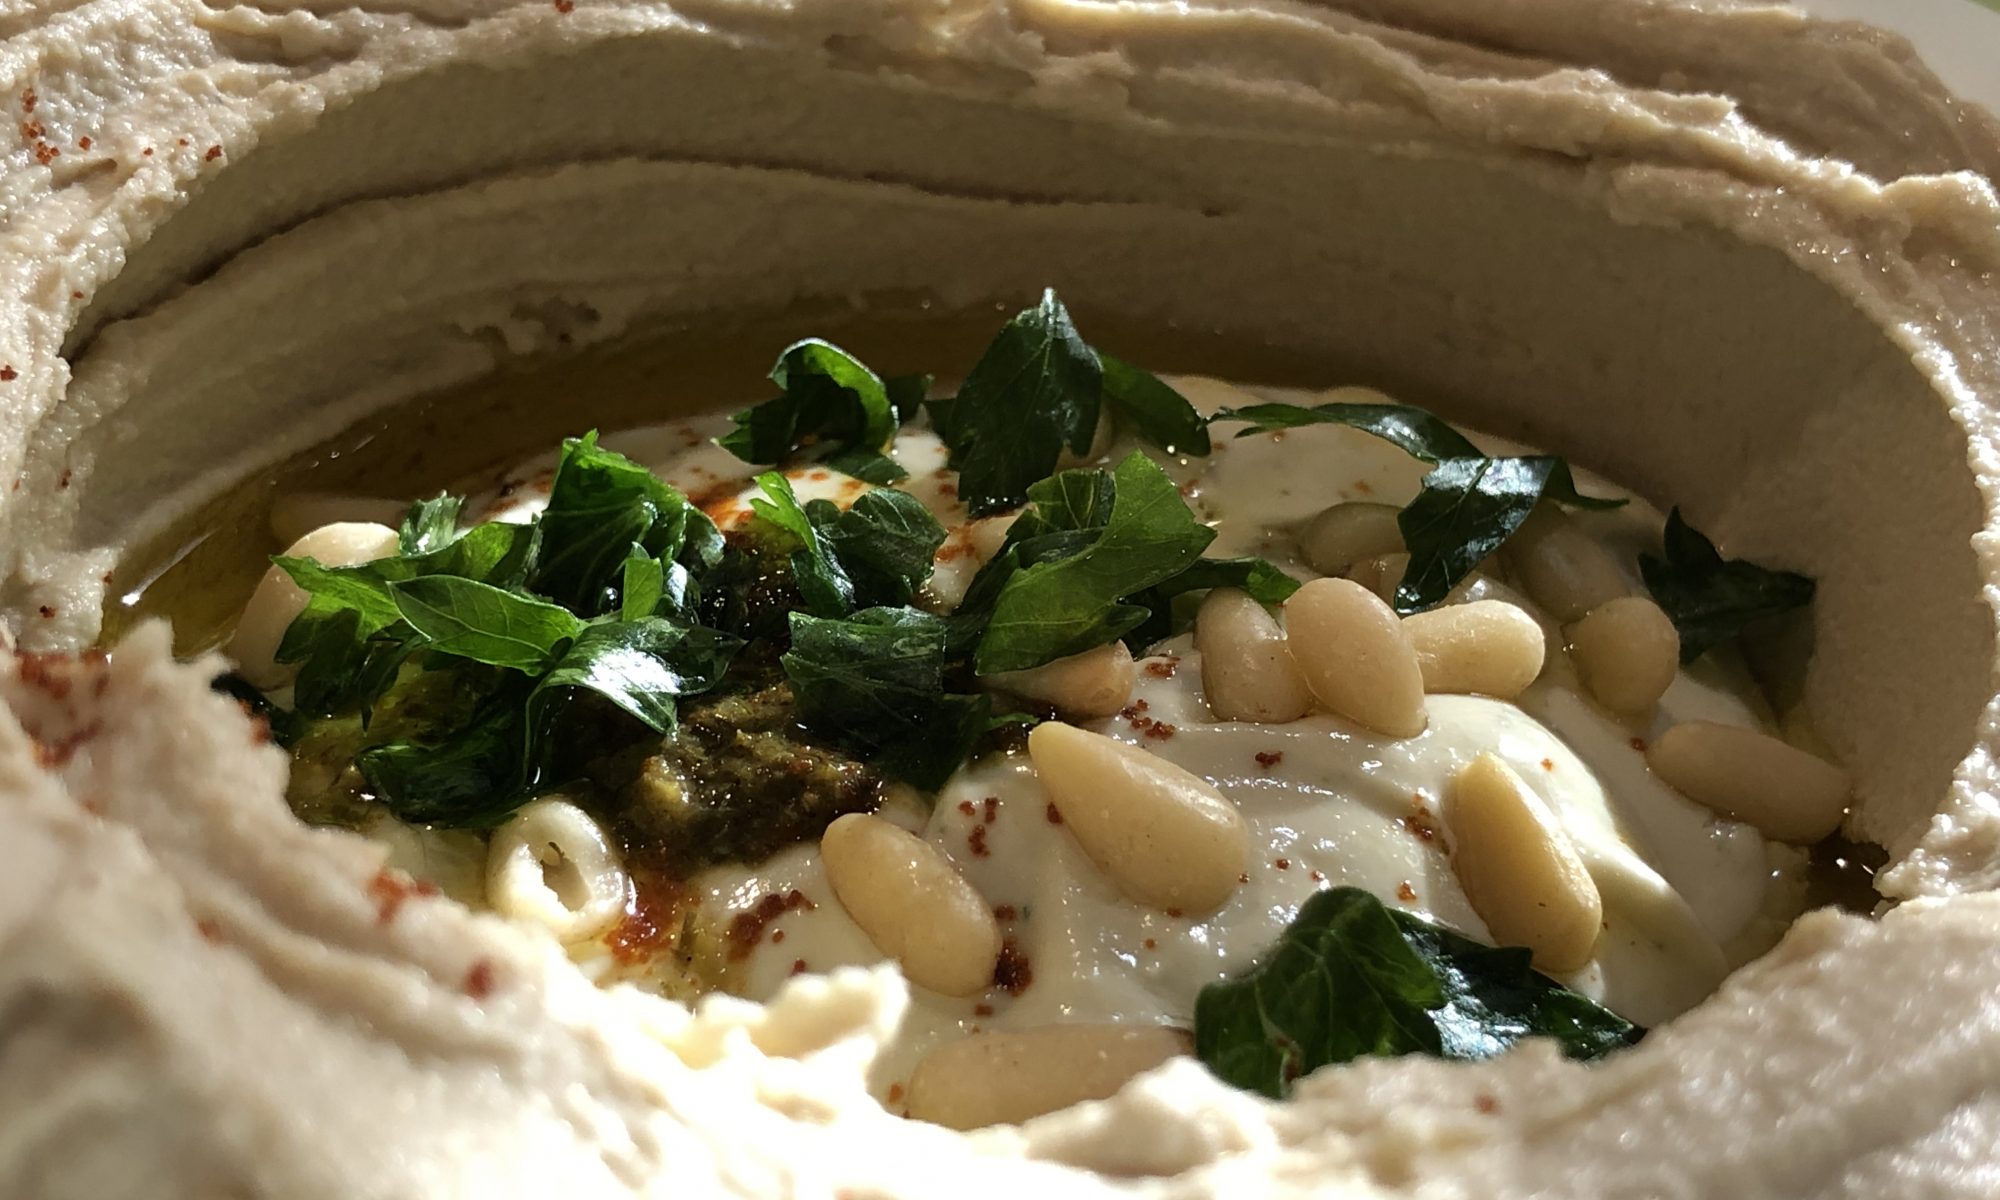
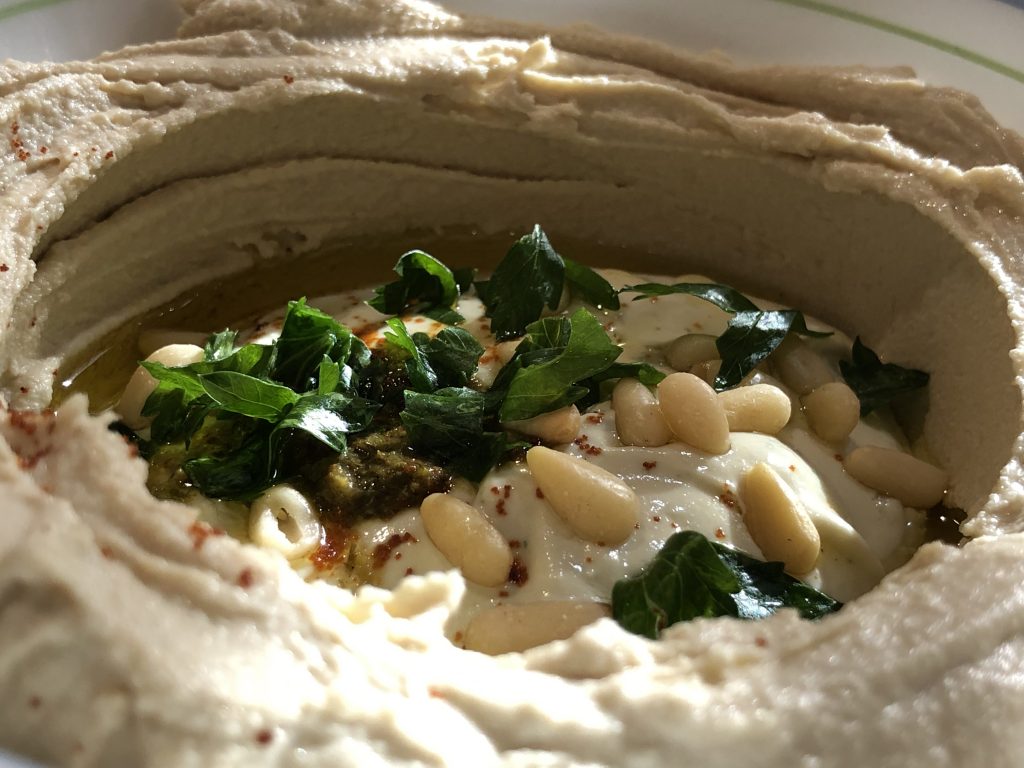
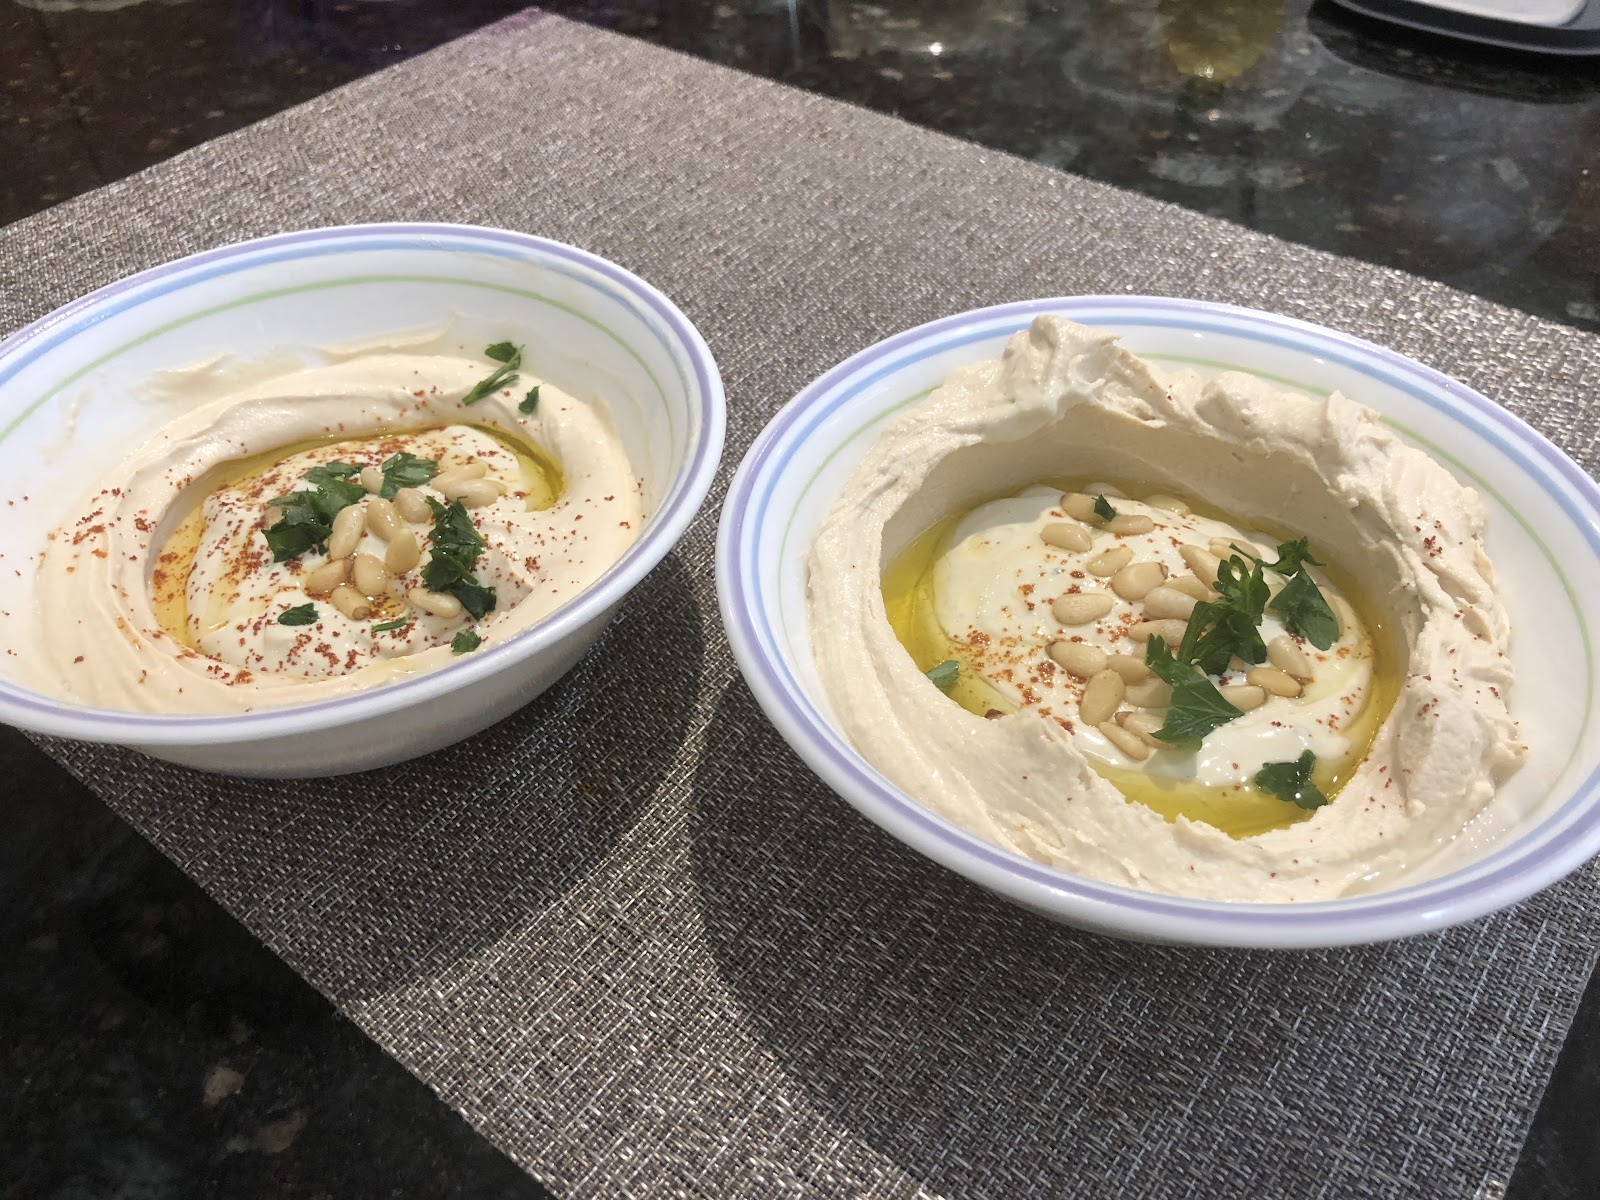
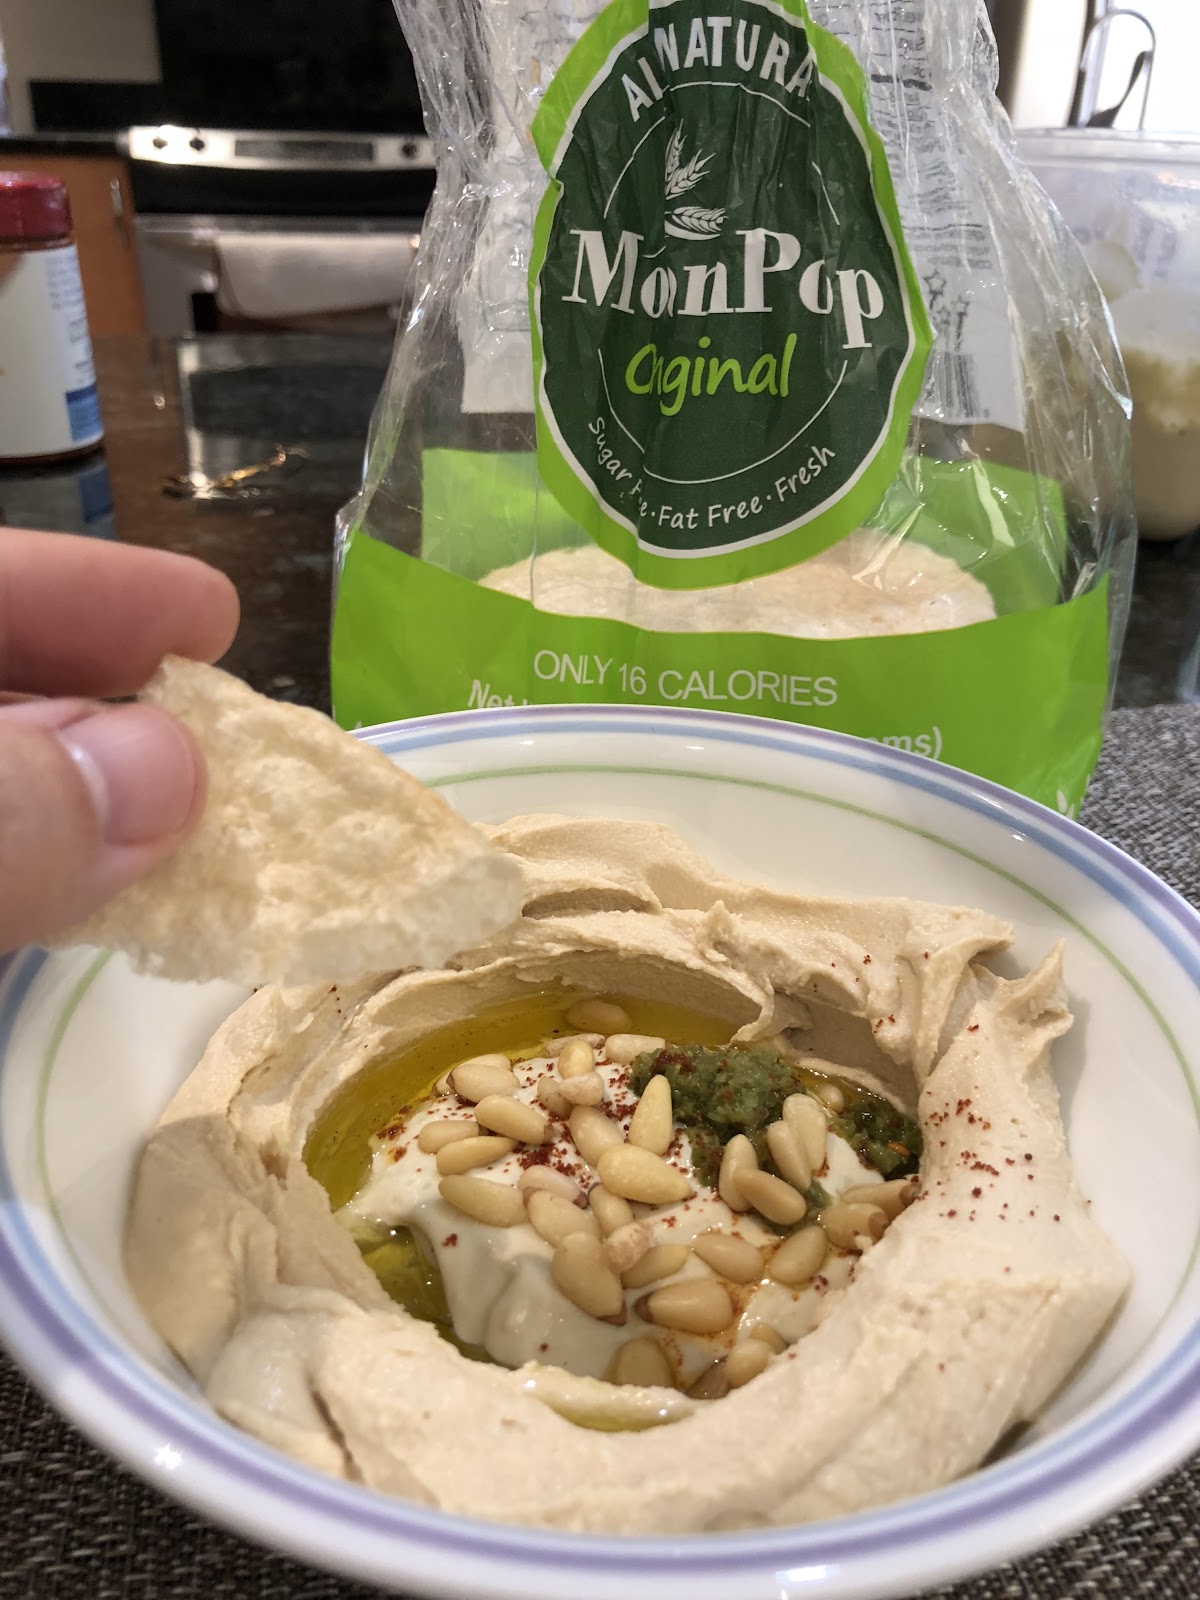
Serve the Hummus with paprika, roasted pine nuts, good (not light) EVOO (extra virgin olive oil), and some parsley.
Brave people will eat it with a strong and spicy Yemeni dip called S’CHUG (here is a recipe I found online)
A lite option can be eating it with Moon Pops.
Should I use beans from a can?
Many people will only use dry garbanzo beans and go through the process of soaking and cooking for hours. Personally, after years of trying I have finally locked in on a winning cooking recipe that gave me the expected consistency, so these days I rarely use canned beans, but for many years I was only using canned beans, and I was happy. Frankly, I still use canned beans when I need to make large amounts, host a big group of friends for dinner, or need a quick way to make Hummus in less than 1 hr, start to finish, when I don’t have any frozen beans from a previous cook. Canned beans give me great results and save me 1-2 hours of cooking and 24-48 hours of prep (soaking, swapping freshwater, etc.), so I use canned beans once in a while! Go ahead and kill me, if you think I’m crazy.
But no doubt, the self-cooked beans do elevate the taste and remove some of the bitterness and aftertaste that you get from canned beans.
The cooking method I suggested above, was inspired by many recipes I read and tried over the years, including one by my good friend and Hebrew/Israeli food blogger, Yuval Shchory. My recipe shared here is the best method I found to get the consistent results I was looking for, so if nothing else, at least follow these steps until you feel comfortable to make it your own.
Do share if you learned something new, or found some inconsistencies in my instructions. This recipe is a living document since my method evolves all the time. I’m trying to make this recipe reflect my “current” way of making my Hummus.
Make this either ahead of making the Hummus, or while the beans are cooking/heating up.
Ingredients:
2-4 Lemons
3-5 Garlic cloves
Instructions
Squeeze the juice of the lemons (to yield about 1/2 – 3/4)
Peel the garlic cloves
Place the fresh lemon juice and the garlic cloves into a mini food processor with a splash of freshwater (~ 1/8th of a cup or more if you prefer a less sour result)
Moosh it all together in the mini food processor.
Through a fine-mesh strainer, push the mix into a container, and use a spoon to smash the garlic through the fine strainer into a smooth lemon liquid.
Strainer to push garlic through with a spoon
Alternative prep method, without a food-processor:
Grate the garlic using a microplane fine grater (see below) to make a paste of garlic
Mix it well with the fresh lemon and a splash of water
You may still run it through the strainer, but I found that using this method, the strainer step doesn’t add much.
Microplane fine grater
You can store the juice in the fridge for a good few weeks if you made extra.
Making homemade Hummus from canned garbanzo beans is an easy and quick way to get consistent and fast results, but once you go home-cooked beans, you can’t go back.
The process is longer, but well worth the effort.
And the good news, these cooked beans are great even when frozen and used later, so you can make larger batches, and freeze them in vacuum bags.
Recipe
Makes: 3-4 batches of about 2lb (950g) each
Overall time: 24-48 hrs; Active prep time: 1.5-2 hrs.
Note:Garbanzo and Chickpeas are two names of the same exact bean (at least to the best of my research 😂). What’s important is to get the tiniest beans you can get your hands on; the smaller the size, the better and less bitter your Hummus will taste.
In this recipe, when I write beans, I refer to the garbanzo/chickpea beans.
Ingredients
3 cups (~750g / 1.6lb) of dry beans
Baking soda (1/2 tsp)
water (as needed)
1/4-1/2 White Onion – optional
Plastic (or other non-metal) bowl
Large cooking pot (or a pressure cooker)
Palouse Brand’s dry chickpeas is the best I found in the US to date
Instructions
The day before (about 24-36 hrs ahead of cooking)
Inspect your beans for any bad beans, little stones, or any other non-bean artifacts (some vendors are better than others in cleaning up)
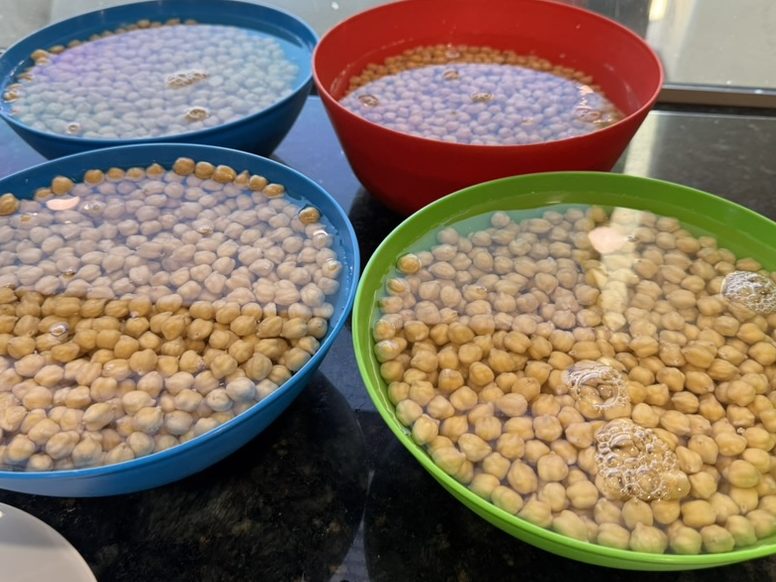
Soak the dry beans in fresh water (at least 1 inch over the beans) in a plastic bowl and mix with the 1/4 tbsp baking soda (this will help the beans soften better later on)
Let it sit for 12-24 hours, replacing the water at least twice during that time.
There is no need to re-add baking soda each time.
Remember that the beans will double in size, so you will need a large enough bowl
Use plastic (or glass) bowls. Metal bowls will interact with the chemicals, potentially ruining your container and breaking your beans.
Beans soaking for 12-24 hrs
On cooking day
After at least 12 hours, but not more than ~48 hours, rinse the beans one last time, and
Tip: Some people let the beans sprout and are covered by a damp towel or paper for some time. The claim is that it enhances the overall flavor and helps reduce the amount of gas passed after eating the Hummus later on. However, swapping the water enough times should provide a good enough alternative.
Choose your method of cooking: “Regular Cooking”, or using a “Pressure Cooker”.
Place the drained beans in the cooking container, and cover with water at least 1.5 inches above the beans.
Optional: add 1/4-1/2 dry white onion (you can wrap it in cheesecloth if you want to be able to remove it easily at the end, because we usually do not keep the onion)
Prepare beans for cooking
Regular Cooking
Bring to a boil and then keep cooking on medium-low heat for ~2.5-3 hours (until ready).
Tip: The time can be shortened to about 1.5-2 hours if you add 1/2 tsp of baking soda
Scoop out any foam buildup during the cooking process
If needed, add water to ensure the beans are covered at all times
Cooking is finished when the beans are hard enough to keep their structure, yet can easily be squashed between your fingertips with very light pressure. If you can’t squash them, keep cooking, but if they do not resist, you probably overcooked them, so, well… you need to go back to step one… or crack open a can of store-bought beans… 🤔
Pressure Cooker
Bring to a boil
Scoop out any foam that forms during the boiling process
Once water is boiling, reduce heat to medium heat
Scoop any foam for the last time and lock the pressure cooker lid
Cook for 25 minutes (make sure the pressure is built; if not, your temperature might be too low, so add a few more minutes)
Once time is over, remove from heat (or turn off if using electric cooker) and let it cool down for at least 20 minutes before releasing the pressure, so that you don’t spray your kitchen with white foam (trust me, take your time).
Tip: put a towel over the steam valve to reduce splatter (be careful as it will get wet and hot).
Check if the beans are ready; if not, you can cook them a bit more for 5-7 minutes, and repeat the cooldown process.
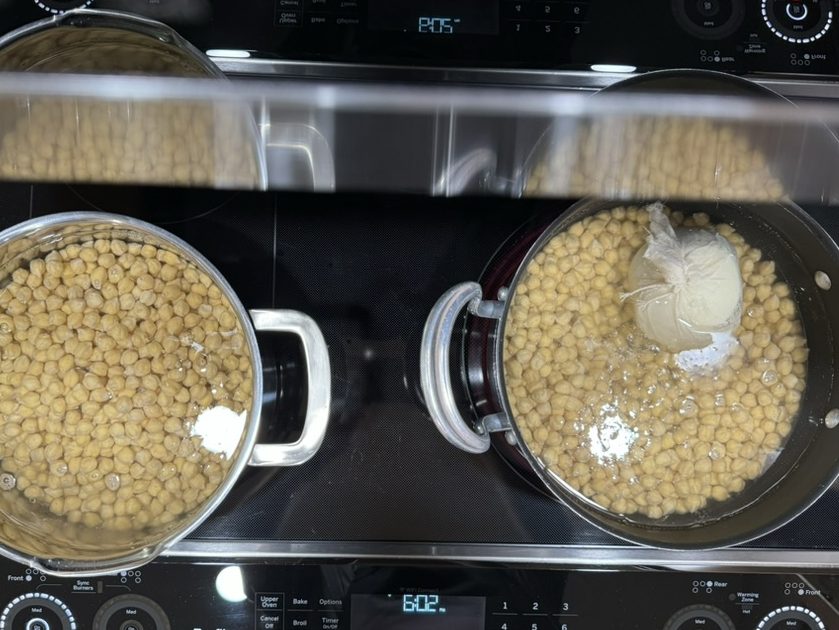
Cooking beans (regular cooking)
Once cooked
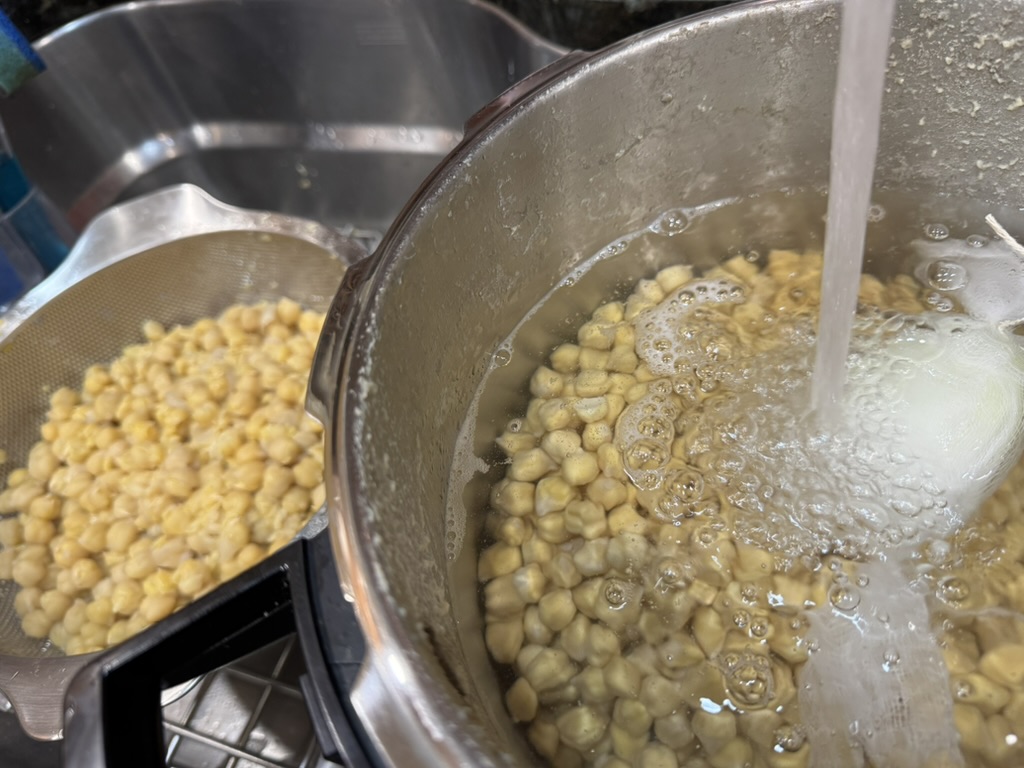
If you added the onion, throw it away, and rinse the beans under cold water.
Tip: Rinsing in cold water stops the cooking process and ensures your beans are not overcooked.
Depending on the beans you used and the amount of baking soda, you might have shells floating around. I like to separate the shells from the beans. It is 💯 ok to keep them as is. See below for how. It’s all about your personal preference.
Split the beans into portions of ~2lb (~950g) (~3-4 cups).
If you cooked more than a single batch, I strongly recommend storing the remaining portions in vacuum-sealed bags, once cooled, and freezing them until the next time you need them.
Vacuum bags are ready to be sealed and frozen
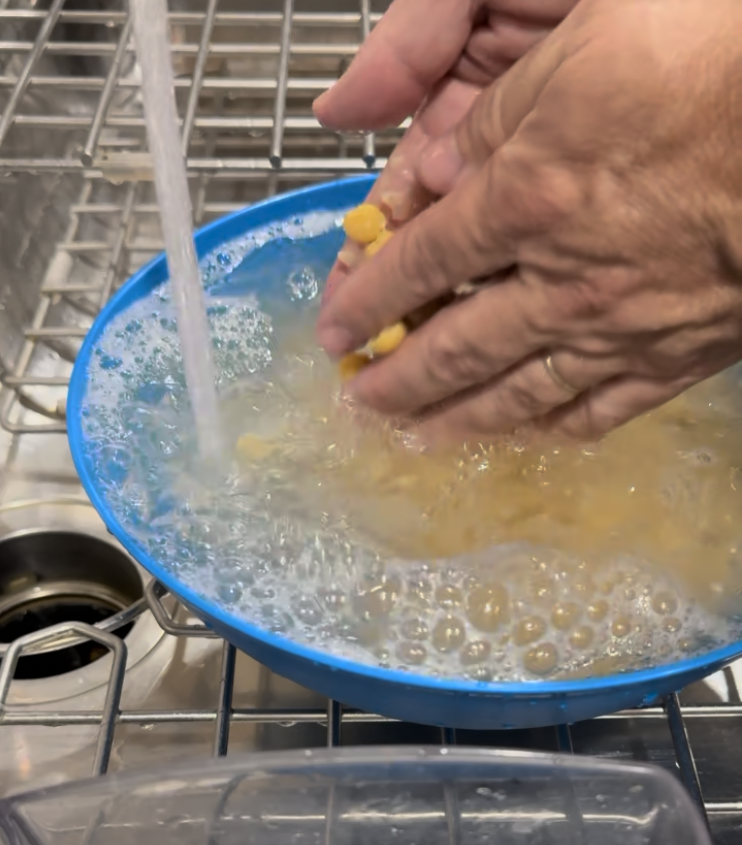
Optional: Separating the shells
Drain the beans and place them under running cold water in your plastic bowl.
With your (clean) hands, rub the beans between your palms to help the shells fall off the beans.
Tilt the bowl to let the water with the floating shells fall off the edge of the bowl.
Refill with cold water, and repeat 3-4 times until there are no more floating shells to clean.
Separating shells from beansLetting shells float over the edge
Note: this recpie is based on a recipe by the owner of a famous Israeli Shawarma place called “Shawarma Ha-Kosem”, or in pure English: “The Magician’s Shawarma”. link.
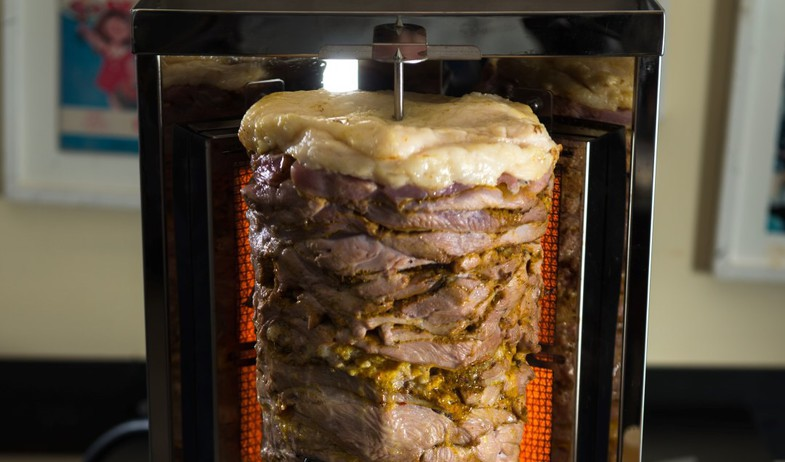
Slowburn
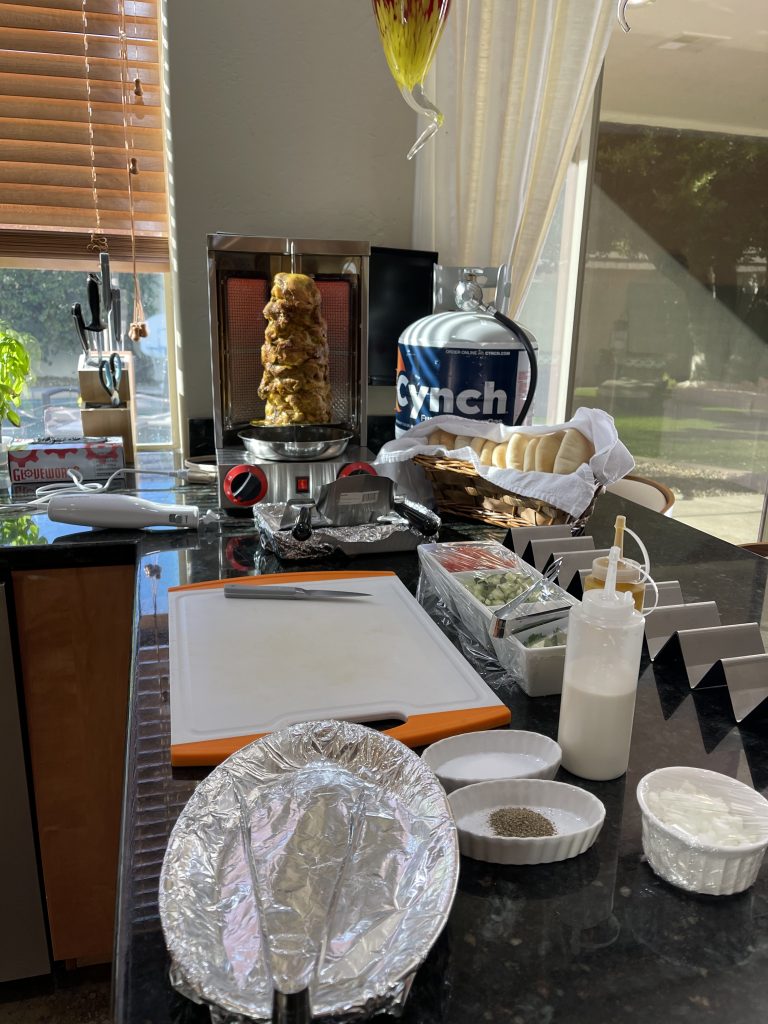
My complete setup
My Shawarma recipe is the result of a long search for a good Shawarma that matches what I remember back home in Israel.
Growing up in Ramat Gan, Israel, I had access to one of the most famous Shawarma places in the country, which is still there to this day, called “Shawarma Shemesh” (“The Suns’ Shawarma”).
Shemesh (i.e. Sun) is a somewhat common last name in Hebrew, for Iraqi immigrants, which many of them ended up clustering in the city of Ramat Gan. The place is named after the last name of the owner, to the best of my knowledge.
People would stand in line to get a serving of this amazing Shawarma staffed into a fresh pita with very few simple additions: some fresh diced tomatoes and cucumbers, tahini sauce, a bit of amba sauce (a strong flavored yellow condiment made of pickled mango), some hot peppers spicing paste (SCHUG), and maybe some french fries. But the hero is the meat.
The Shemesh Shawarma setup
In more recent years, the very hungry people could get their serving wrapped inside a 10″ flat pita, known as an Iraqi pita, instead of inside a pita’s pocket. This is called a LAFFA (Arabic for roll), and it will typically look like this:
Shawarma in a lafa (rolled flat Iraqi-style pita). This is big, really big. I don’t think I was able to finish this one up, which is why a had time to take a picture of it)
But no matter how you consume your Shawarma, once you had your first one you can’t go back. No offense to the greek Gyro (and I’m not even talking about the American version that is basically a huge pile of processed meat, like a rotating hotdog), a good old Shawarma taste fresh, you can feel the meat, you can see the meat, and the flavors are to die for.
Usually, it is made of layers of female turkey thighs, which are hard to find in the US, but my version is using chicken thighs, and gets the same result, if not even slightly better if I can say so myself.
In my personal opinion, the flavor is controlled by two main factors: the dry rub spices mix you use, and the quality plus amount of the lamb fat that is running throughout the meat.
If you nailed these two, any decent meat will work. You can find great Shawarma made of Turkey, Chicken, Lamb, or a mix of these. But my favorite has to be the Turkey and Chicken ones. They are the juiciest, and they observe and retain the flavors of the dry-rub and the fat, in the best way.
My Shawarma Recipe
Ingredients:
For the dry-rub (enough for more than a single serve):
5-6lb Chicken thighs (deboned, no skin, fat trimmed). Tip: Costco’s thighs are perfect. 2-3 of their 6 pouch pack is a perfect size.
~1lb ground lamb fat
~5oz sliced lamb fat
6 tablespoons Amaba spread
Optional: 1/2 cup pinenuts
Optional: small onion
Optional: small tomato
Directions:
Mix all spices of the dry-rub well (this will last for more than a single making, so keep the leftovers for future use).
Clean the meat from any large patches of fat or non-meat artifacts like ligaments etc.
Butterfly or split the thighs into flat ½” fillets
Rub the meat with the spices mix and let it sit for at least 10-15 minutes (overnight in the fridge is optional, but really not needed)
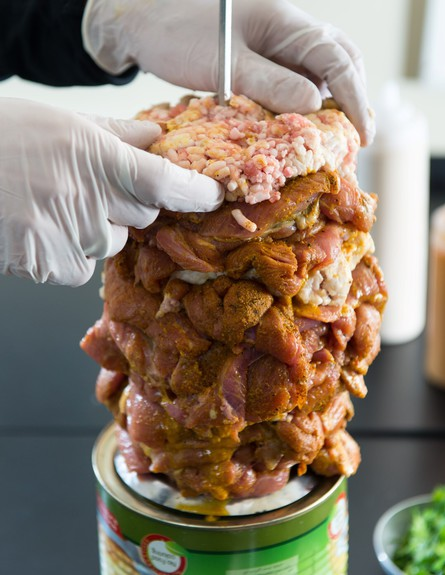
Depending on the method you choose to build the skewer (see alternative options at the end), place 2-3 layers of the meat, followed by about ¼” of ground lamb fat (see picture below)
Spread a bit of Amba on the fat (I also like to add some pinenuts at this point)
Repeat until you are done with all the meat, or out of skewer space, whichever comes first 😅
Make sure to leave enough space at the top for your machine to handle the skewer.
adding a layer of ground lamb fat, this makes all the difference. Cover it with Amba, and optional pinenuts before moving to the next layer. Source: hakosem recipe
Top with a few layers of sliced lamb fat
sliced lamb fat on top will ensure the whole meat is cooked in the fat oils as they melt during the cooking process. Source: hakosem recipe
Optional: wrap the whole skewer in a plastic food wrap and roll to tighten the shape.
Optional: Leave the skewer in the fridge over-night, to let the dry-rub sink dipper into the meat, or if you simply want to prepare the skewer the night before the big day.
Optional: put a small onion and tomato on top, just before starting the cooking process.
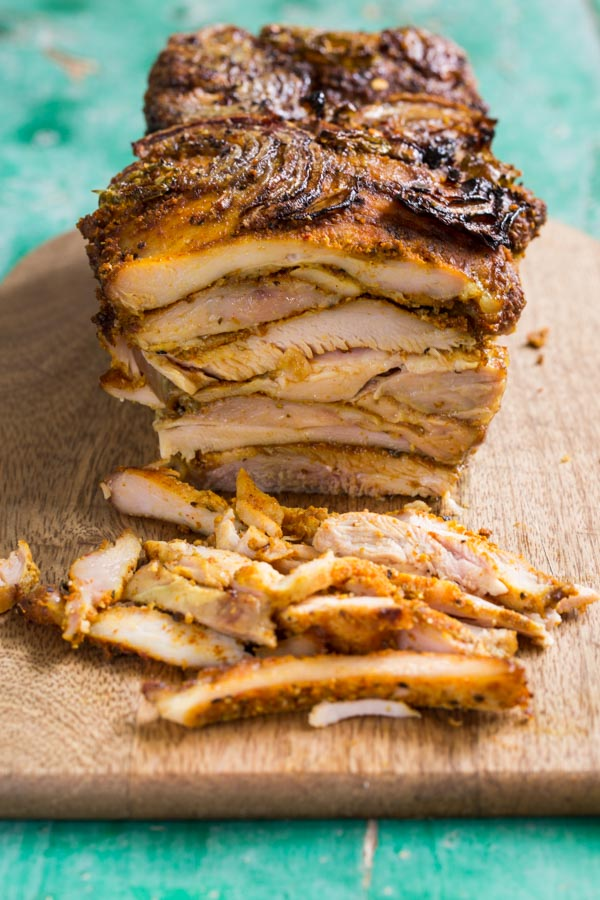
Gameday: Making the Shawaram
Cooking time is different depending on the method you use, but anywhere between 40-60 minutes is the time it would take to have the outer layers ready to be eaten.
Although the outer layer is more cooked than the inner layers, after the first 45-60 minutes, most of the meat is already cooked, and the only difference is the amount of crispiness you’ll get by letting fresh layers of unshaved meat rotate a bit more against the fire/heat source.
As for temperature, I don’t have a good number for you, just start high and monitor to not burn your meat.
On an electric or propane rotisserie, it takes about 45-60 minutes, and the heat is almost fixed. If you can adjust the heat, you can lower it after the 45 minutes mark.
Serve the shaved meat in a pita with some hummus spreaded, diced tomatoes and cucumbers, some drizzled tahini sauce, and french fries, and you are all good to go.
Served in pita. Tip: filling two halves of Pita gives you more meat and less waste! Btw this picture is using a whole-wheat pita! A healthier option!
Want a more gluten-free option? skip the pita, plate on a bed of rice or in a plate of Hummus, drizzle some Tahini on top, and you are set.
Getting serious: invest in a shawarma machine
Although I will list below few alternatives for making your shawarma without a dedicated machine, the best option is to use a machine. Here are a couple of options you can use on a tight budget.
You can find both electric rotisserie machines and propane-based machines on Amazon at prices ranging between $85 – $250. Do your research carefully to make sure the seller is trustworthy. These reviews are important!!!
In any case, make sure to use or buy an electric knife to carve your meat, because it has to be a very sharp knife to handle this meat and most people don’t have these special knives at home, and also you don’t want to keep sharpening your knife as you carve your meat.
The two machines that I have tried (but are not always available in stock on Amazon) are below.
Electric Shawarma machine
Note: I didn’t use this exact one, but the one I used is discontinued, so this is the closest version I found.
Alternative methods if you don’t have a Shawarma machine
Not all of us are so serious about Shawarma that we are ready to buy a machine. Don’t worry, there are options for you as well. Here are a couple of methods that are known to give decent results.
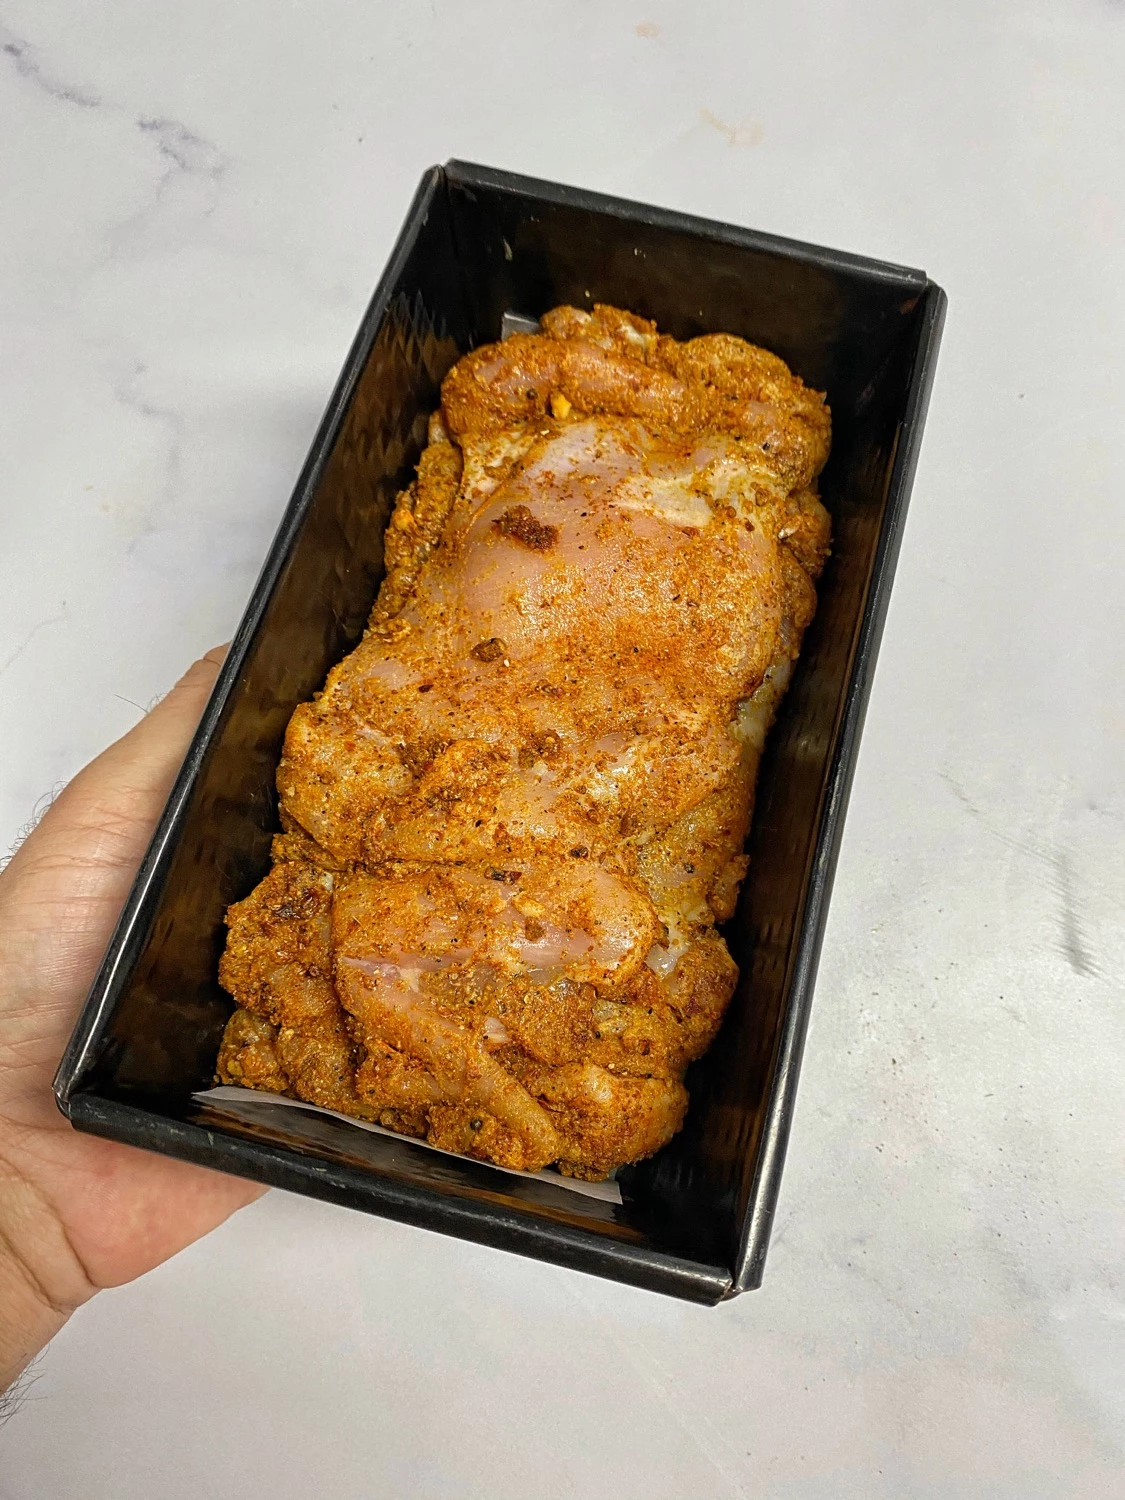
Best alternative: in the oven in a loaf pan
Source: Google imagesSource: Google images
Layer the meat in a baking pan.
Preheat your oven to 355ºF and cook for about 60-90 minutes.
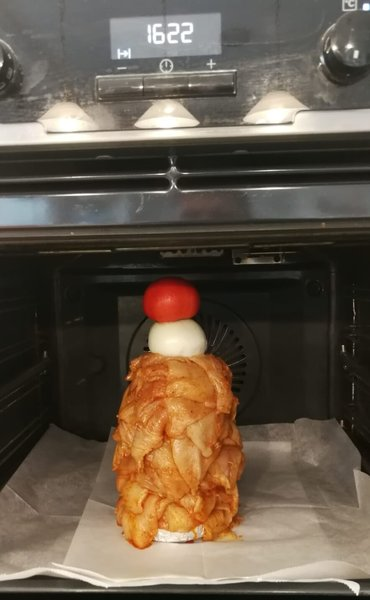
Almost as good: on a wooden skewer
Cut a large onion in half. Place one half on your baking sheet, and push a wooden skewer into it.
Layer your meat on it and top with the 2nd half of the onion
making a skewer stand from half onion and a wooden skewer. Source: Google Images
Wrap it all in baking paper and then foil.
Preheat your oven to 355ºF and cook for about 60-90 minutes.
Pill off the foil and baking paper and put back in the oven for another 15-30 minutes for the final roast.
This blog post was created because, just like you, at one point I wanted to record a multi-track podcast with remote guests. Someone told me to use “.. a Mix-Minus setup…”, but after hours of Googling, I didn’t find my answer. Well, hopefully, this is your last stop on this Google rabbit hole.
My Promise to you: by the time you are done reading this blog, you will (i) understand what is a “mix-minus” configuration, and (ii) be able to configure it using Logic (Pro) X on your Mac.
You can skip to the “how-to” section if you think you understand Mix-Minus and only care about the step-by-step instructions, but I would argue that even if you think you understand it, you want to read the theory part first, because, and I say it from personal experience, this mix-minus remote-recording process is confusing!!! If you first read my theoretical part, at least the how-to part will be easier to follow because it will use the same “language”.
Editorial note: I originally posted this blog back in mid-2018, but since then Loopback by Rogue Amoeba, which this solution depends on, was updated to version 2.x that was not compatible with the original writeup. I also learned a few tricks since then and I found ways to make this process a bit easier. Also, I’m writing this in November 2020, about ~10 months into the COVID-19 pandemic, where remote recording is needed more than before, now that so many people are preferring to stay remote and record from home!
The Theory on One Leg
Let’s start with “what” is a mix-minus, then go to the why we need it, and finally, we’ll dive into the how!
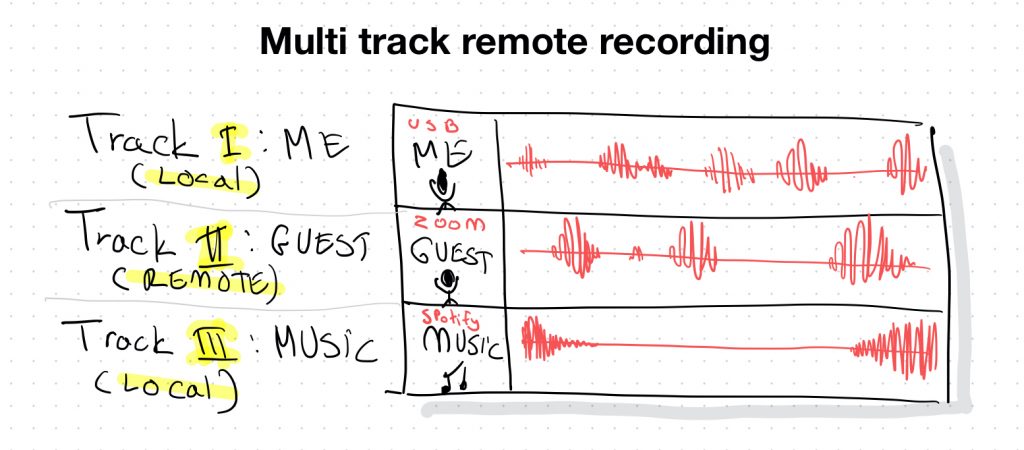
What is a Multi-track recording
A multi-track recording is what DAWs (Digital Audio Workstations) are all about, record your multiple sources of audio on separate tracks, so that you can edit them individually, then mix them together, and master them into a single stereo mix and finally bounce your mix into a ready-to-share MP3 file. If all your guests are located in the same recording studio, you can do this quite easily by routing each guest’s microphone into a separate channel, and off you go. I assume you already know how to do this, so I will not dive into details on this part.
What is a Mix-Minus, and why do I need it?
Good question. When all your guests are in the same room, all you need in order to have a conversation is making sure that they all can hear each other, and whatever music/SFX you are playing to them all. Typically, you can just let them all hear the same rough mix that you are listening to while recording. But, when your guests are not all in the same room, mostly because of the delay of the Internet, if you let them all listen to the same rough-mix, each participant will hear themselves in a slight delay, just slight enough to drive them crazy.
The premise of Mix-Minus: provide each participant with the same master mix minus their own voice. By doing this, we can ensure that they don’t hear themselves, and don’t get confused by “that other person who sounds almost like them and keeps interrupting them every time they open their mouth” 😂.
How does Mix-Minus recording works
Before we jump to the step-by-step tutorial, let’s understand how does a multi-track mix-minus remote recording works.
It is important to understand that there are two separate problems that we need to solve for here:
Record each source of audio (yourself, remote guests, and your music app) into individual tracks
Create a mix-minus to send back to each remote guest
Let’s start with the multi-track recording, and end on the heavier mix-minus topic.
Multi-Track Recording
Typical multi-track recording
To create the above setup, we need to find a way to route all sources in such a way that each source is playing on a separate audio channel, so we can map each track on our DAW to record only that source. This will allow us, during the editing and mixing phase, to have full control over each track, so we can mute that barking dog of yours, or remove that sneeze coming from your guest over the music, etc.
If life was easy, this could have been done by simply arming each track of your DAW with a different source, but since Mac imposes a limitation of a single input and output device on Logic, we need to use some external help to create what is known as a “Virtual Aggregate Device”. This kind of device is a software generated device that can represent multiple inputs and outputs of individual devices, and turn them into a single device that can be selected by Logic as the input/output devices . This is where Loopback will come to save us. More on this later on.
Here is a typical list of sources you can record into your Podcast mix on Logic:
A browser playing music from YouTube* or any other internet source
One or more remote guests coming over a VoIP (Voice over IP) communication tools. Few examples:
Zoom
FaceTime
Skype
WebEx
(* be aware of music licensing restrictions when using any music)
By combining all these sources into a single virtual device, we can point Logic to this multi-source virtual device, and record each source into its own track.
Again, we will get to the exact step-by-step soon, meanwhile, let’s move on to the next step, the infamous Mix-Minus configuration.
What is Mix-Minus, and Why?
Simply put, a Mix-Minus is the process of sending back an individual mix to each participant, that includes the master mix minus their own sound.
Let’s visualize this.
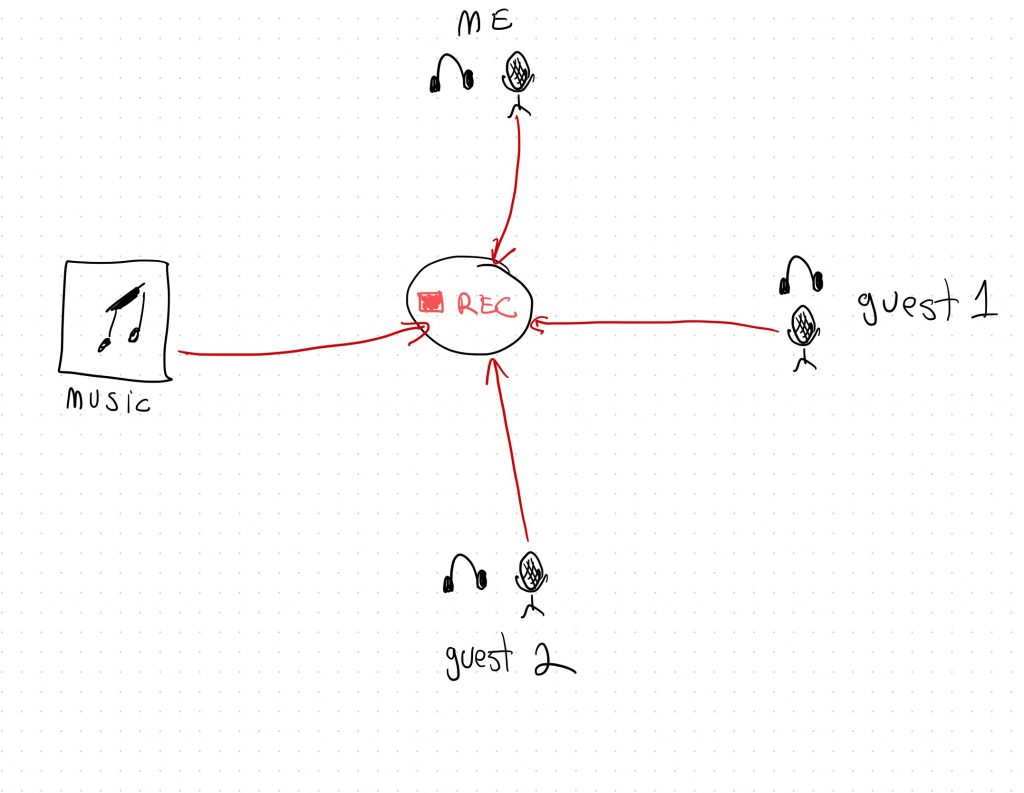
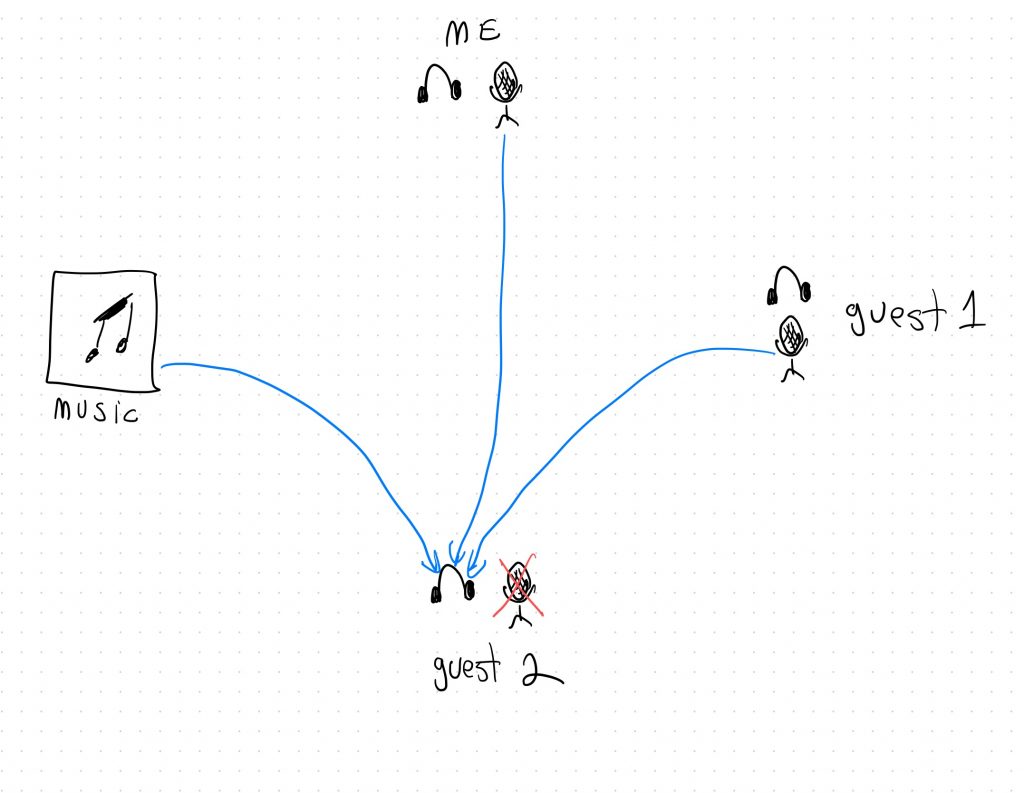
For the following example we will assume a setup of 4 entities:
A local USB microphone (yourself)
Remote Guest #1
Remote Guest #2
A local music source (e.g. Apple Music, Spotify, a YouTube tab in your browser, etc.)
Recording setup
Assuming that the above is the setup for recording, let’s break it down to the individual mix-minus setups.
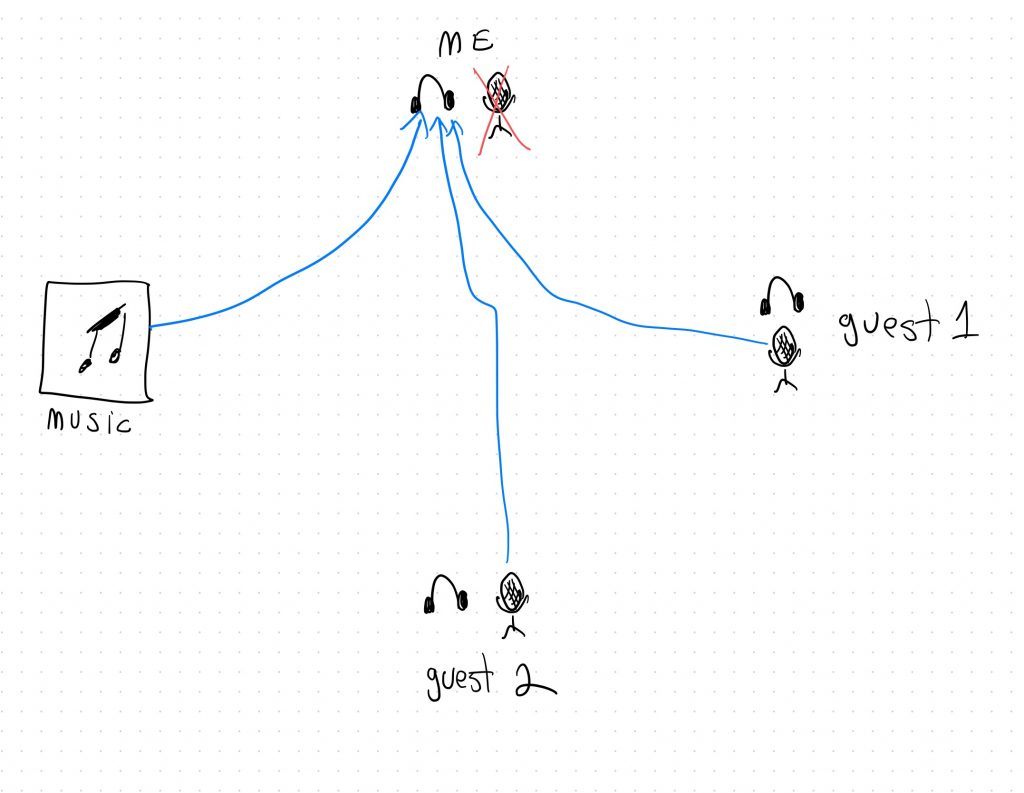
For yourself, you want to hear everything except for your own microphone:
Host’s mix-minus configuration
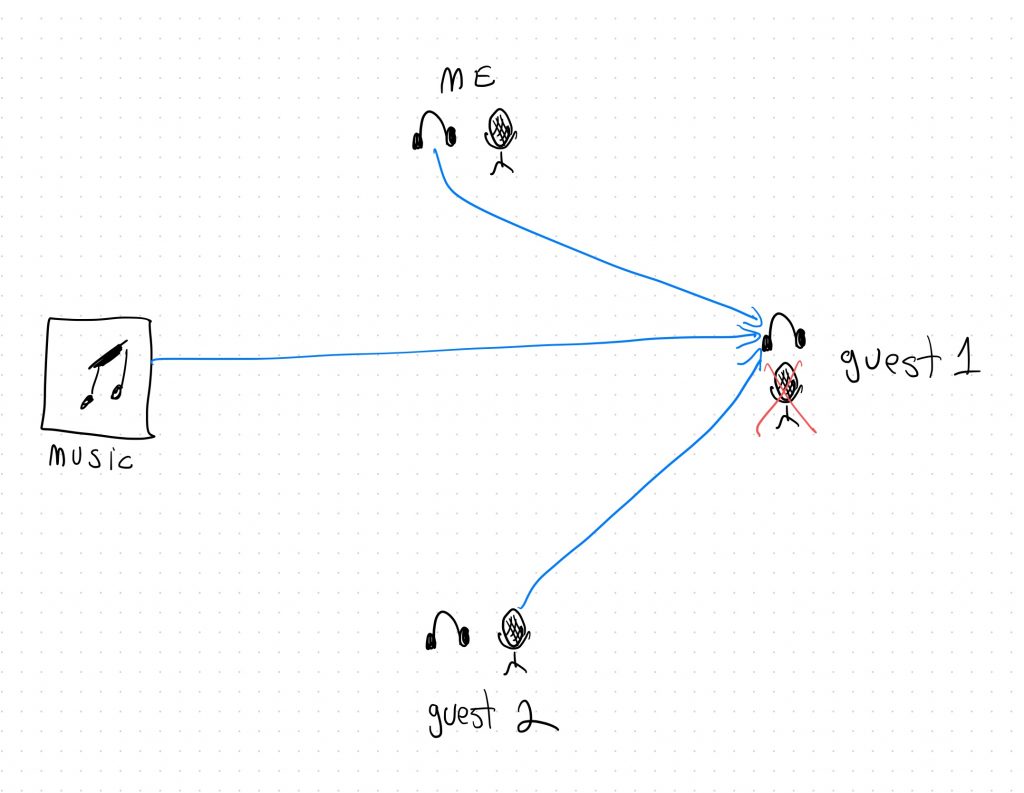
For Guest 1 and 2 you would expect these two mix-minus configurations:
As you can see, each of the two guests receive the sound of the other sources except of their own microphone.
Since the music player is not “listening in” on the conversation, it doesn’t require a mix-minus back to it (one less thing to worry about 😅)
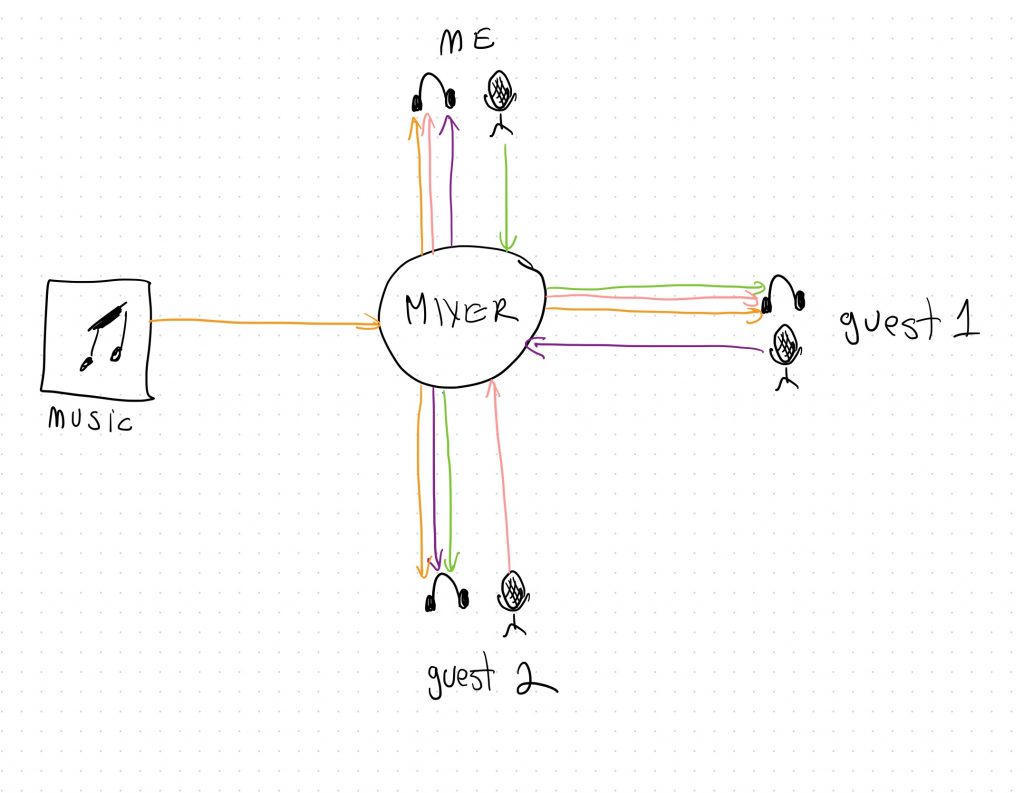
If we try to overlay these all into a single diagram it would look like this:
A complete view of the mix-minus setup
As you can see each source (music, your own mic, and the two guests’ mics) are all sent to all other people, but each does not receive their own mic sound back.)
As long as the “mixer” (Logic Pro X) is recording each input individually, and sends each guest a “custom” mix of all these tracks minus their own microphone, we are done.
Now that we get the theory, let’s get to the hands-on part, and start implementing this.
Let’s make this happen!
Disclaimer: This tutorial is specific to Logic Pro X, and depends on Loopback 2 by Rogue Amoeba, both available only for macOS. There are similar tools for an MS Windows, and this concept can be translated for a Windows environment, but this is beyond the scope of this tutorial. If you are a Windows wizard and you managed to configure this on Windows and would like to share, I would be more than happy to link to your solution. Hit me through the comments section.
Pre-requisites
Latest macOS with up-to-date Logic Pro X installed
Loopback 2 by Rogue Amoeba compatible with your version of macOS.
Part 1: Setup multi-track recording
To make the process easy, we will do the recording part first, and later on add the mix-minus setup on top of it.
The first challenge with Logic Pro X, is that Logic is inheriting the macOS limitation of supporting a single input device at a time. Also, it can only recognize physical connected devices such as a USB microphone, a USB audio interface, and similar, but not software sources such as Spotify, or YouTube running in a browser. In order to record the output of an application (be it Spotify, or a communication tool such as Zoom or FaceTime), we need some help. This help comes in the form of Loopback.
What is Loopback?
In short, Loopback is a “magical” piece of software that allows you to take control over audio on your computer, and route sounds generated by any sound source however you like. E.g. grab your USB microphone, your Zoom output, and your YouTube player, and turn them into a single device with all these sources as individual channels.
In our case Loopback is used to create 3 types of devices:
Combines all audio sources into a single “virtual device” so we can use it as the input device for Logic, and record each source into its own individual track.
Create a virtual multi-channel output device, so we can output the individual mix-minus mixes back out of Logic into each remote guest’s session.
Create a set of individual Mix-Minus “virtual microphone/speaker” devices for each of our communication apps like Zoom, FaceTime, etc., to be used as their microphone input and speaker output device.
This might still sound confusing at this point, but this will all make sense soon.
For this tutorial, we will assume the following scenario:
Source
Physical/Application
Microphone (me)
Physical USB
FaceTime (Guest 1)
Application
Zoom (Guest 2)
Application
Spotify (music)
Application
list of sources in our tutorial and their types
Let’s group all these into a single input device that Logic can use.
Launch Loopback and get ready to add some virtual devices.
Create a “Speaker” virtual device for Zoom:
Click the “New Virtual Device” and name it “Zoom Speaker Mix(-)“
It should already have a default “Pass-Thru” and an output stereo channel configured, so nothing more to do here.
Repeat this for any additional applications you might want to use such as FaceTime, Skype, WebEx etc.
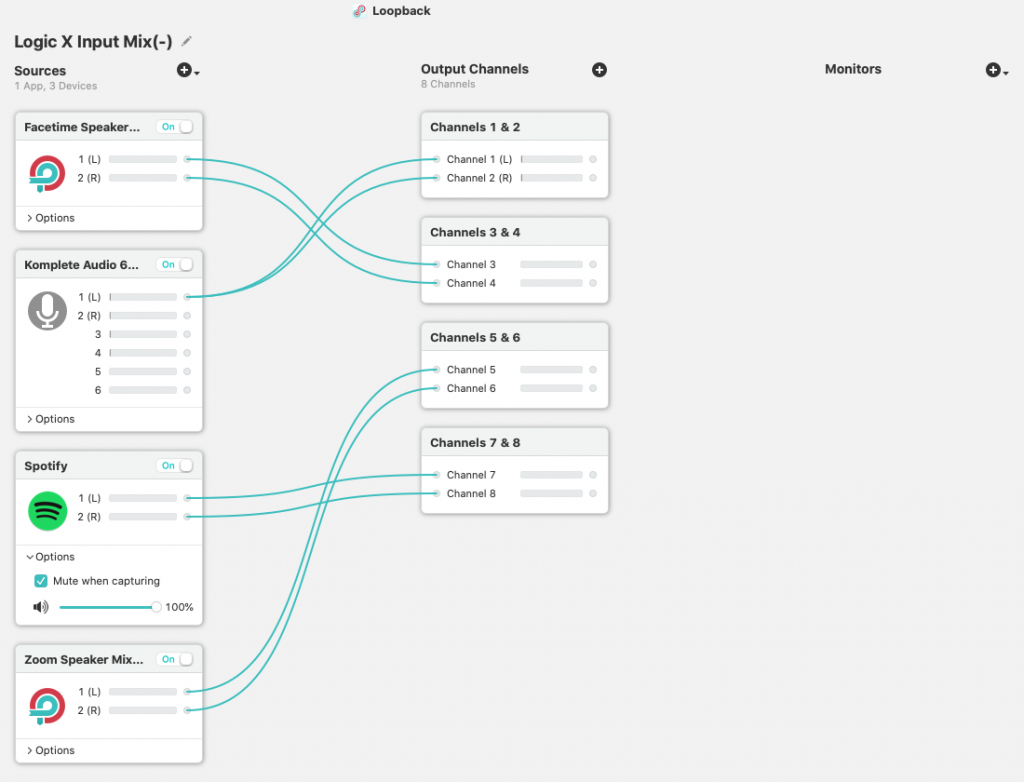
Create the Logic’s Input virtual device:
Click the “New Virtual Device” button, and name it: “Logic X Input Mix(-)“
Remove the default Pass-Thru device (we don’t need it for this device)
Click the (+) button on the source column and add the following sources:
Zoom Speaker Mix(-)
FaceTime Speaker Mix(-)
Your USB microphone
Spotify (you need to install the desktop version of Spotify for this to show, otherwise you can add your browser and play it through there)
Next, click the (+) in the Output Channels column and add one for each input you have (you should have at least 3 if you set it up as above, or more if you added more applications.
Remove any connectors lines that have been automatically added by Loopback so we can setup our own set of connectors.
Connect each input to a single output channel as shown in the example below.
Note that Loopback orders the sources by name, but you can reorder the outputs routing to match whatever order makes more sense for you. E.g. I like to have my microphone be the first output, my Spotify last, and my guests in the middle one after another…
Also note that since my Microphone is a mono mic, I chose to route it to both the L/R channels of its Output Channel.
Now what you have is your Logic virtual input device that combines all your sources mapped into a set of 8 or more individual pairs of channels.
Configure the communication apps
You now need to configure your communication apps (Zoom, FaceTime etc.) to use their virtual speaker devices as the speaker to connect to.
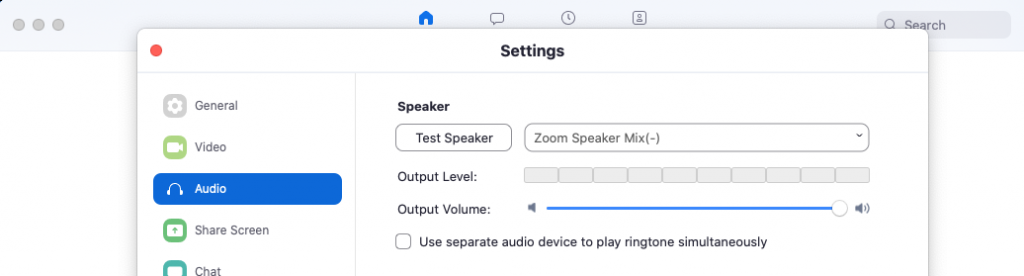
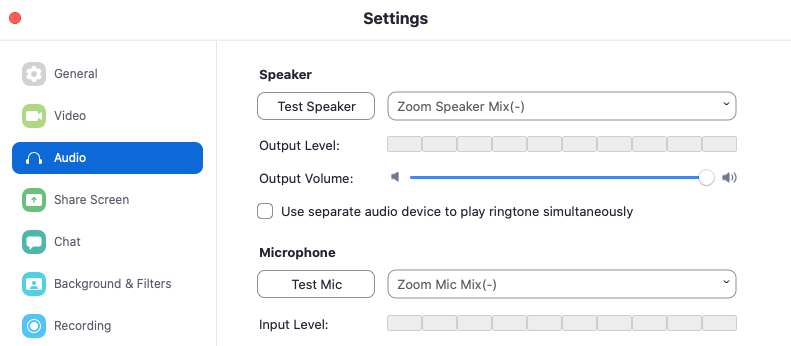
Here is an example for Zoom:
configuring Zoom Speaker to send its output to our virtual device
By navigating to Zoom’s audio configuration, change your default speaker output to the new “Zoom Speaker Mix(-)” virtual device we have created in Loopback.
To quickly test that the Zoom configuration works correctly, hit the “Test Speaker” button and watch the flow of the sound between Zoom, to the “Zoom Speaker Mix(-)” to the “Logic X Input Mix(-)” devices
Note: you might not hear anything through your headphones/speakers, but if the meters are “dancing” in sync you are all set.
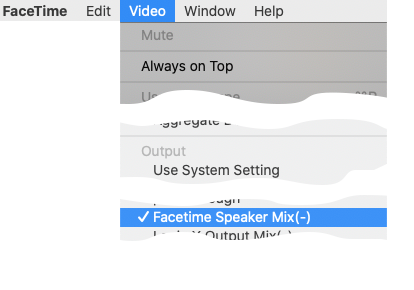
Configure FaceTime output
If you also configured a virtual device for FaceTime, launch FaceTime on your Mac, and set its output to the dedicated virtual device by going to the Video menu, and selecting the “FaceTime Speaker Mix(-)” as the Output:
Bringing it all into Logic
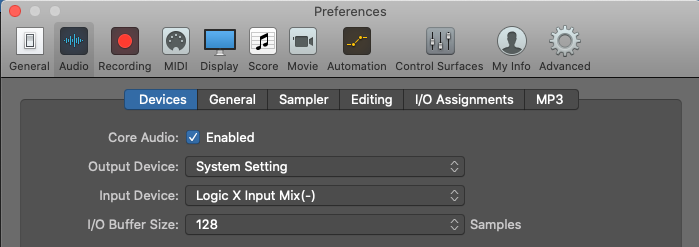
Launch Logic, start a blank audio recording project and configure it as follows:
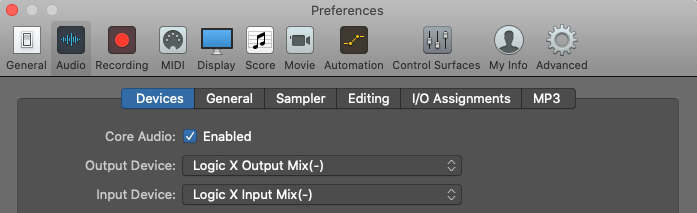
Open preferences -> Audio
Select “Logic X Input Mix(-)” as your Input Device (leave the output as is for now, we’ll get back to it soon).
Add new audio recording tracks for each input (Mic, Zoom, Spotify, etc.)
Update the input of each to match the mapping in your Loopback virtual device.
preferences. Notice the selected Input device
Here is an example of my setup with the local Mic, Zoom, FaceTime, and Spotify.
mapping of loopback Logic X Input device to Logic tracks
As you can see above, after adding the 4 tracks, I have set the input of each to match the relevant output. I also renamed them to help me tell them apart, and change their icons to help me know what source each one of them represents.
At this point you can start recording a multi-track sessions, but, it will be hard to monitor it, because you can’t hear anything yet.
If you arm all the tracks (hit the R icon), and also hit the Monitor button (I button), you will be able to hear all your sources playing and if you run a recording test, you will see that each track is recording its individual input and later on you will be able to edit them individually.
Part 1 is complete, the multi-track recording is configured. Next to the monitoring phase, and creating the individual mix minus tracks for each.
Configuring the Mix-Minus devices
In order to configure a mix minus, we need to add two sets of new virtual devices in Loopback:
A “catch-all” single output device for Logic, to allow us mapping each guest’s mix into its own channel. We will name it the “Logic X Output Mix(-)” device
A set of individual pass-thru devices for each communication application (Zoom, FaceTime, etc.) to route their specific output from the above device to their input.
We will then be able to configure Logic to create the individual mix-minus outputs.
Let’s get started.
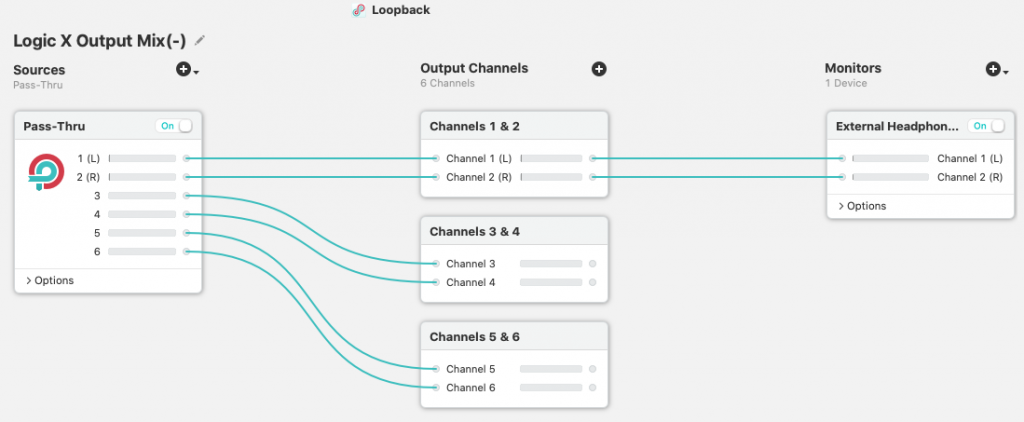
Back in Loopback create a new Virtual Device, and name it: “Logic X Output Mix(-)”
Leave the default Pass-Thru source device, we will use it in just a moment.
In the Output Channels columns, add additional Output Channels for each guest. E.g. if you have yourself, a Zoom guest, and a FaceTime guest, you should have 3 Output Channels added.
You will notice that Loopback automatically add outputs to your Pass-Thru source, and map it to each output. This is great for us and we will keep it as is.
Next, add one monitor in the Monitors column, and choose your preferred local speakers (e.g. your built-in Headphones, your USB output, etc.). This will be the device through which you will listen to your local mix as you record the session. Tip: You want to work with headphones to avoid any spill of the other sounds into your track.
Logic virtual output aggregate device
In the example above I have created a setup with 3 stereo output sets, the first of which is connected to my local headphones for monitoring.
Choose which of the output channels is going to be used for each of your VoIP applications. Let’s assume that Outputs 3 & 4 will be for FaceTime, and 5 & 6 for Zoom.
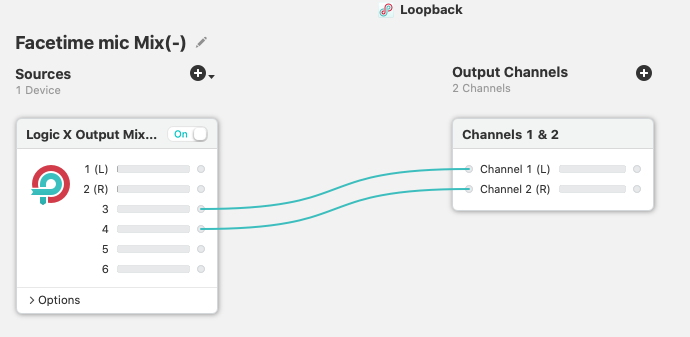
Go ahead and create two new Virtual Devices in Loopback and name them FaceTime Input Mix(-) and Zoom Input Mix(-).
Open the new FaceTime Input Mix(-) virtual device, and remove the default Pass-Thru device. Instead, select from the source the Logic Output Mix(-) device
delete the default connectors added by Loopback, and instead drag two connectors from output 3 & 4 (the ones we dedicated for FaceTime above) to the default L/R output channels
Repeat the same in the Zoom Input Mix(-) device, but this time use channels 5 & 6 to be mapped to the default L/R Output Channel.
Your new devices should look like this:
Back in FaceTime and Zoom select these two new devices as the relevant Microphone/Input
Zoom complete configuration
The same is true for FaceTime, select the new FaceTime Input from the Video dropdown menu.
Finally, let’s get back to logic and complete our Mix-Minus setup.
Go back to Logic’s Preferences Audio setup, and replace the Output to our new “Logic X Output Mix(-)” device.
NOTE: Logic will automatically replace your input to match the newly selected output. You have to manually reselect the input to be the Logic X Input Mix(-) device.
final Logic audio Preferences configuration
Next, let’s configure the individual outputs for each mix-minus by using the audio busses.
If you are not familiar with the concept of a bus in audio, a bus is a way to route a copy of any track into another track. Usually this is used to send a copy of the track to an effects channel, but, it is also very useful for exactly what we are about to do here, create virtual mixes (mix-minus) and send each to a different output channel.
So let’s get started.
Creating bus channels for each output
As a reminder in our example we have a total of 3 pairs of stereo outputs. In Loopback we assumed that channels 1 & 2 will be our local stereo L/R monitor (aka our headphones), 3 & 4 will be our FaceTime mix-minus and 5 & 6 will be our Zoom mix-minus.
To configure this, make sure your mixer is showing in Logic (hit the X key if it is not showing) or the mixer icon on the top nav bar.
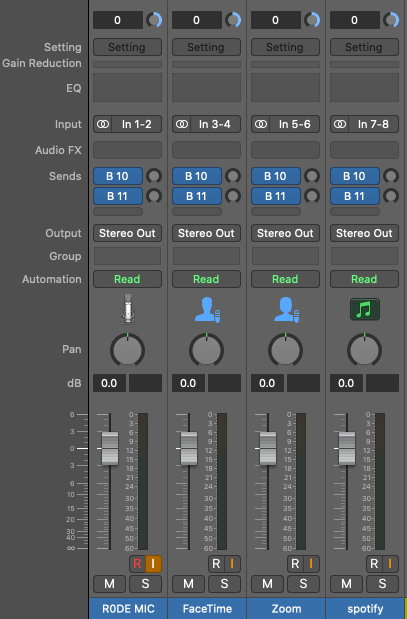
Below the input assignment section, the one we used to assign the inputs, right after the empty “Audio FX” option, there is the “Sends” section. If you click on the empty gray area of the track’s Sends option, it will show a menu. In this menu, you can choose what BUS to send this track to. I like my Mix-Minus bus number to start with bus 10. So go to your first track (the local Microphone if you followed my example), and send it to bus 10. You will notice that a new Aux track was added to the mixer.
Right below the newly added send, click the small gray area to create an additional Send and send it to Bus 11. Repeat for all sources.
It should now look like this:
Bus 10 and 11 added as Sends to all our sources
The newly created send tracks are automatically named Aux 1 and Aux 2. Go ahead and rename them to FaceTime(-) and Zoom(-) respectively.
Then change their Output from “Stereo Out” to channels output 3-4 for FaceTime (-) and Output 5-6 for Zoom (-).
At this point, we are almost done but if you’ll test this, it will not work, because our sends are, by default, set to send nothing. Go head and click the small knob button right of each send button (the four B 10, and B 11 sends) and set their volume to 0db to keep them at a natural volume.
And here is the “mix-minus” part: Keep the send to 0 for sending to self.
Notice the two blue arrows below that show where FaceTime is not sending to the FT bus, and Zoom is not sending output to the Zoom bus. This is the whole idea of the Minus in the Mix-Minus!!!
Setting all sends to 0db except for the MINUS parts
Tip: you can quickly edit these send values by double-clicking the knob and entering the number using your keyboard.
double-click to edit as numbers
Technically we are done. All that is left to do is test.
In order to run a test recording ARM (R button) all input tracks, and hit the Ibutton on the same tracks to monitor the output through your headphones (do not monitor your own Microphone if you are not using headphones, which you probably should because you are a pro! 👍
Play some music on Spotify (or your other selected music source,) and start a zoom and/or FaceTime call.
As you start recording, you will get 4 individual tracks being recorded, each with its own dedicated input, recorded into its own individual track.
Interacting with the Mix-Minus
During the recording you can adjust the mix minus to fit your guest’s needs:
Change the overall volume of what is sent to them by changing the main level of the relevant Aux channel (Zoom – or FaceTime -).
Increase/decrease individual sources by adjusting their send level for that specific bus (e.g. lower the music send to your guests by pulling the send level down on the Spotify track).
Troubleshooting
It may well be that things will not work smoothly on first try.
Here are some common things to do in order to troubleshoot typical issues:
Problem: I can’t hear the music from Spotify/Music etc. Solution: make sure that they are mapped in Loopback as a source device and mapped to the correct Output Channel in your virtual Logic Input Mix(-) device.
Problem: One or all of my VOIP clients (Zoom etc.) do not pick up the audio from Logic: Solution: Try one of the following:
Make sure that your VOIP app is configured correctly with its output sent to your Virtual output device, and their input is set to their relevant input virtual device
Make sure that the mix-minus AUX track in Logic (the one that has the input set to the bus 10 and up) is configured to output to the correct output channels of your Logic Output Mix(-) device
Summary
This was a lot to read, and a lot to learn, and a lot to do. This post was almost completely rewritten from scratch, in an attempt to make this as easy to follow as possible. If you have any questions, suggestions or if you noticed any errors, please feel free to send me a message in the comments section and I’ll do my best to try and help.
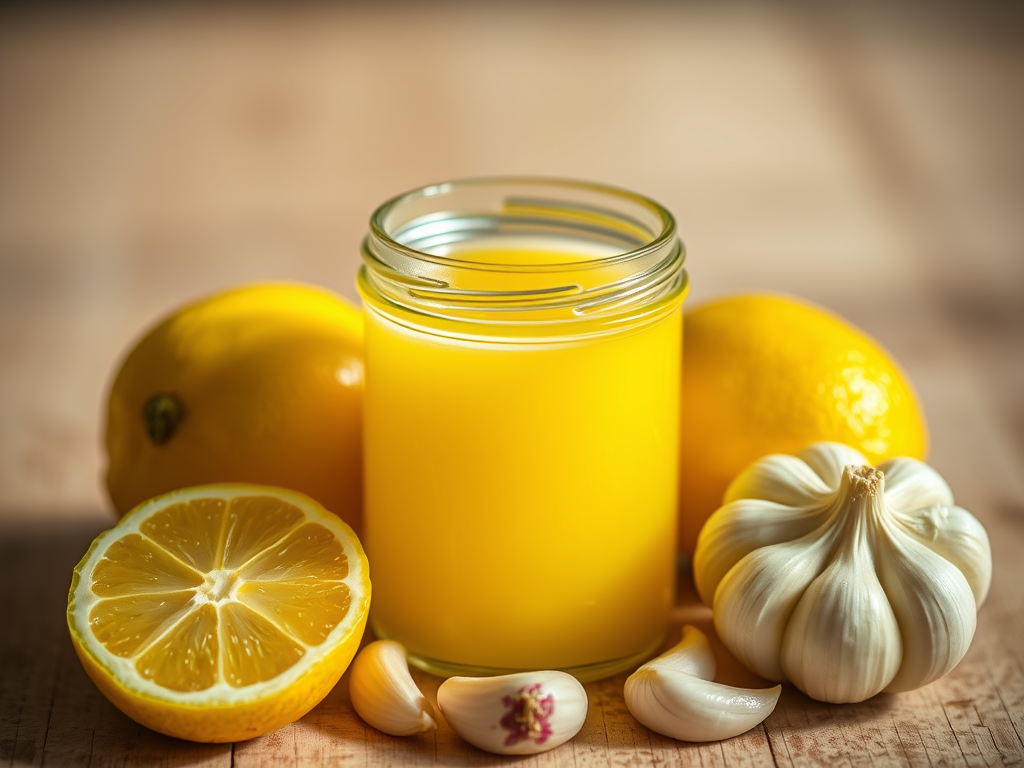
1/2 cup of Lemon&Garlic juice (see instructions in my Hummus Recipe)
Optional: Parsley (for green style tahini)
Preparation
We will make the Tahini directly in the container we will store it in using a handheld stick blenders, so pick a container that is tall enough to hold the Tahini and to be used for the blending process
Example stick blender
Put all the ingredients into the container:
1 cup Tahini paste
1 cup of extra cold water
½ tbsp salt
¼ teaspoon citric acid (optional)
¼ teaspoon cumin
The Lemon & Garlic juice.
Tip: For more of a “green Tahini” style, add about a handful of parsley leaves into the container.
Blend and mesh with the stick blender for a few minutes, taste and add spices as needed.
If the consistency is not liquid enough add a small amount of cold water and keep running. The texture should be smooth silky and the consistency should be semi-liquid like that of a pancake’s batter.